🚛 Vehicles
Manage your fleet — each vehicle, who's driving it, service, and running costs.
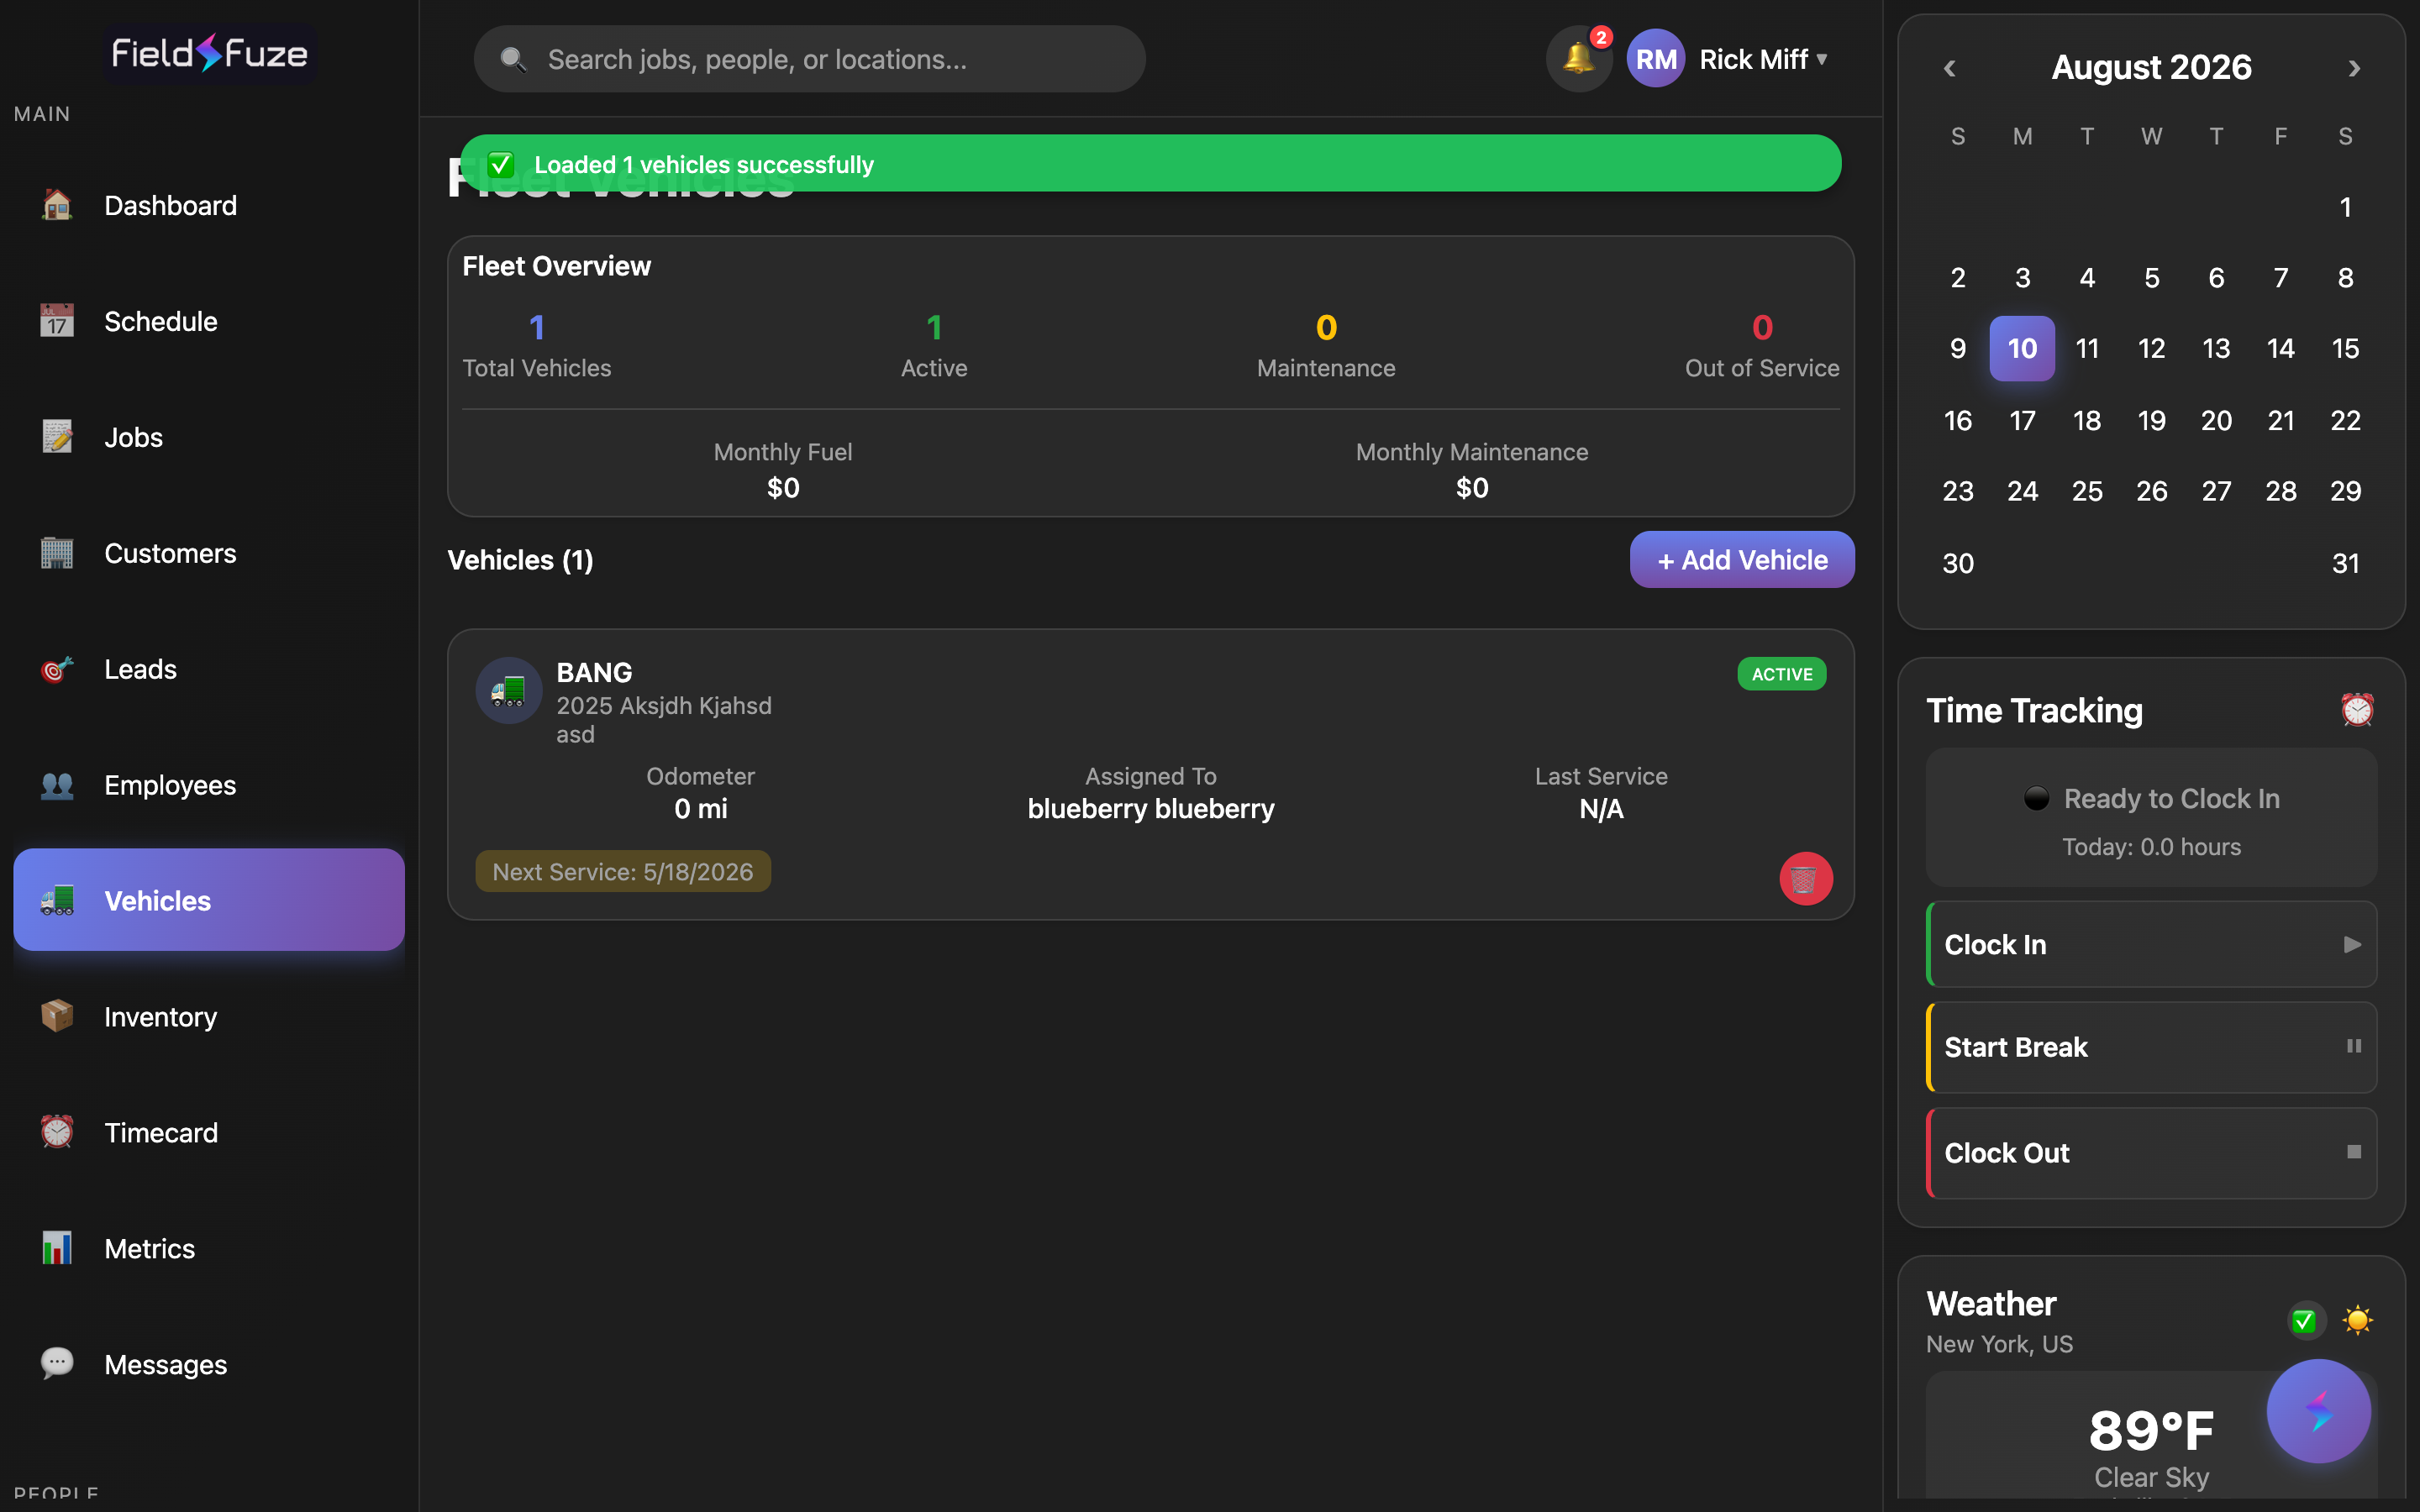
The Vehicles screen is a complete fleet manager built for field crews. Every truck, van, or trailer gets its own record that tracks who's driving it, when it's due for service, what maintenance has been done, how much fuel and upkeep it's costing you, the spare parts stocked on board, and its insurance and registration. Open any vehicle and edit its details right in place — changes save automatically as you type.
- Fleet Overview — Total, Active, Maintenance, and Out of Service counts, plus monthly fuel and maintenance spend and an overdue-maintenance alert.
- Per-vehicle detail — assignment to an employee, a service schedule with reminders (oil change, tire rotation, inspection…), maintenance records with paperwork attachments, fuel logs, insurance/registration, and a per-truck parts inventory.
- Tap-to-edit everywhere — most fields save the moment you finish editing, so keeping records current takes seconds.
- Search your fleet — find any vehicle instantly by name, license plate, make, or model.
Fleet Overview
The Fleet Overview card at the top of the screen gives you an at-a-glance health check on your whole fleet:
- Total Vehicles — every vehicle on your account.
- Active — vehicles currently on the road (shown in green).
- Maintenance — vehicles in the shop or being serviced (shown in amber).
- Out of Service — vehicles temporarily off the road (shown in red).
- Monthly Fuel — this month's total fuel spend across the fleet, rolled up from your fuel logs.
- Monthly Maintenance — this month's total maintenance spend, rolled up from service records.
When any vehicles are past due for service, an ⚠️ overdue-maintenance alert appears on the overview so nothing slips through the cracks. Below the overview, the Vehicles list shows a card for each vehicle with its status badge, year/make/model, plate and color, current odometer, who it's assigned to, its last service date, and the next service date when one is set.
Pull down on the list (or refresh) to reload both the vehicle list and the Fleet Overview totals at once, so your fuel and maintenance numbers always reflect your latest entries.
Adding a vehicle
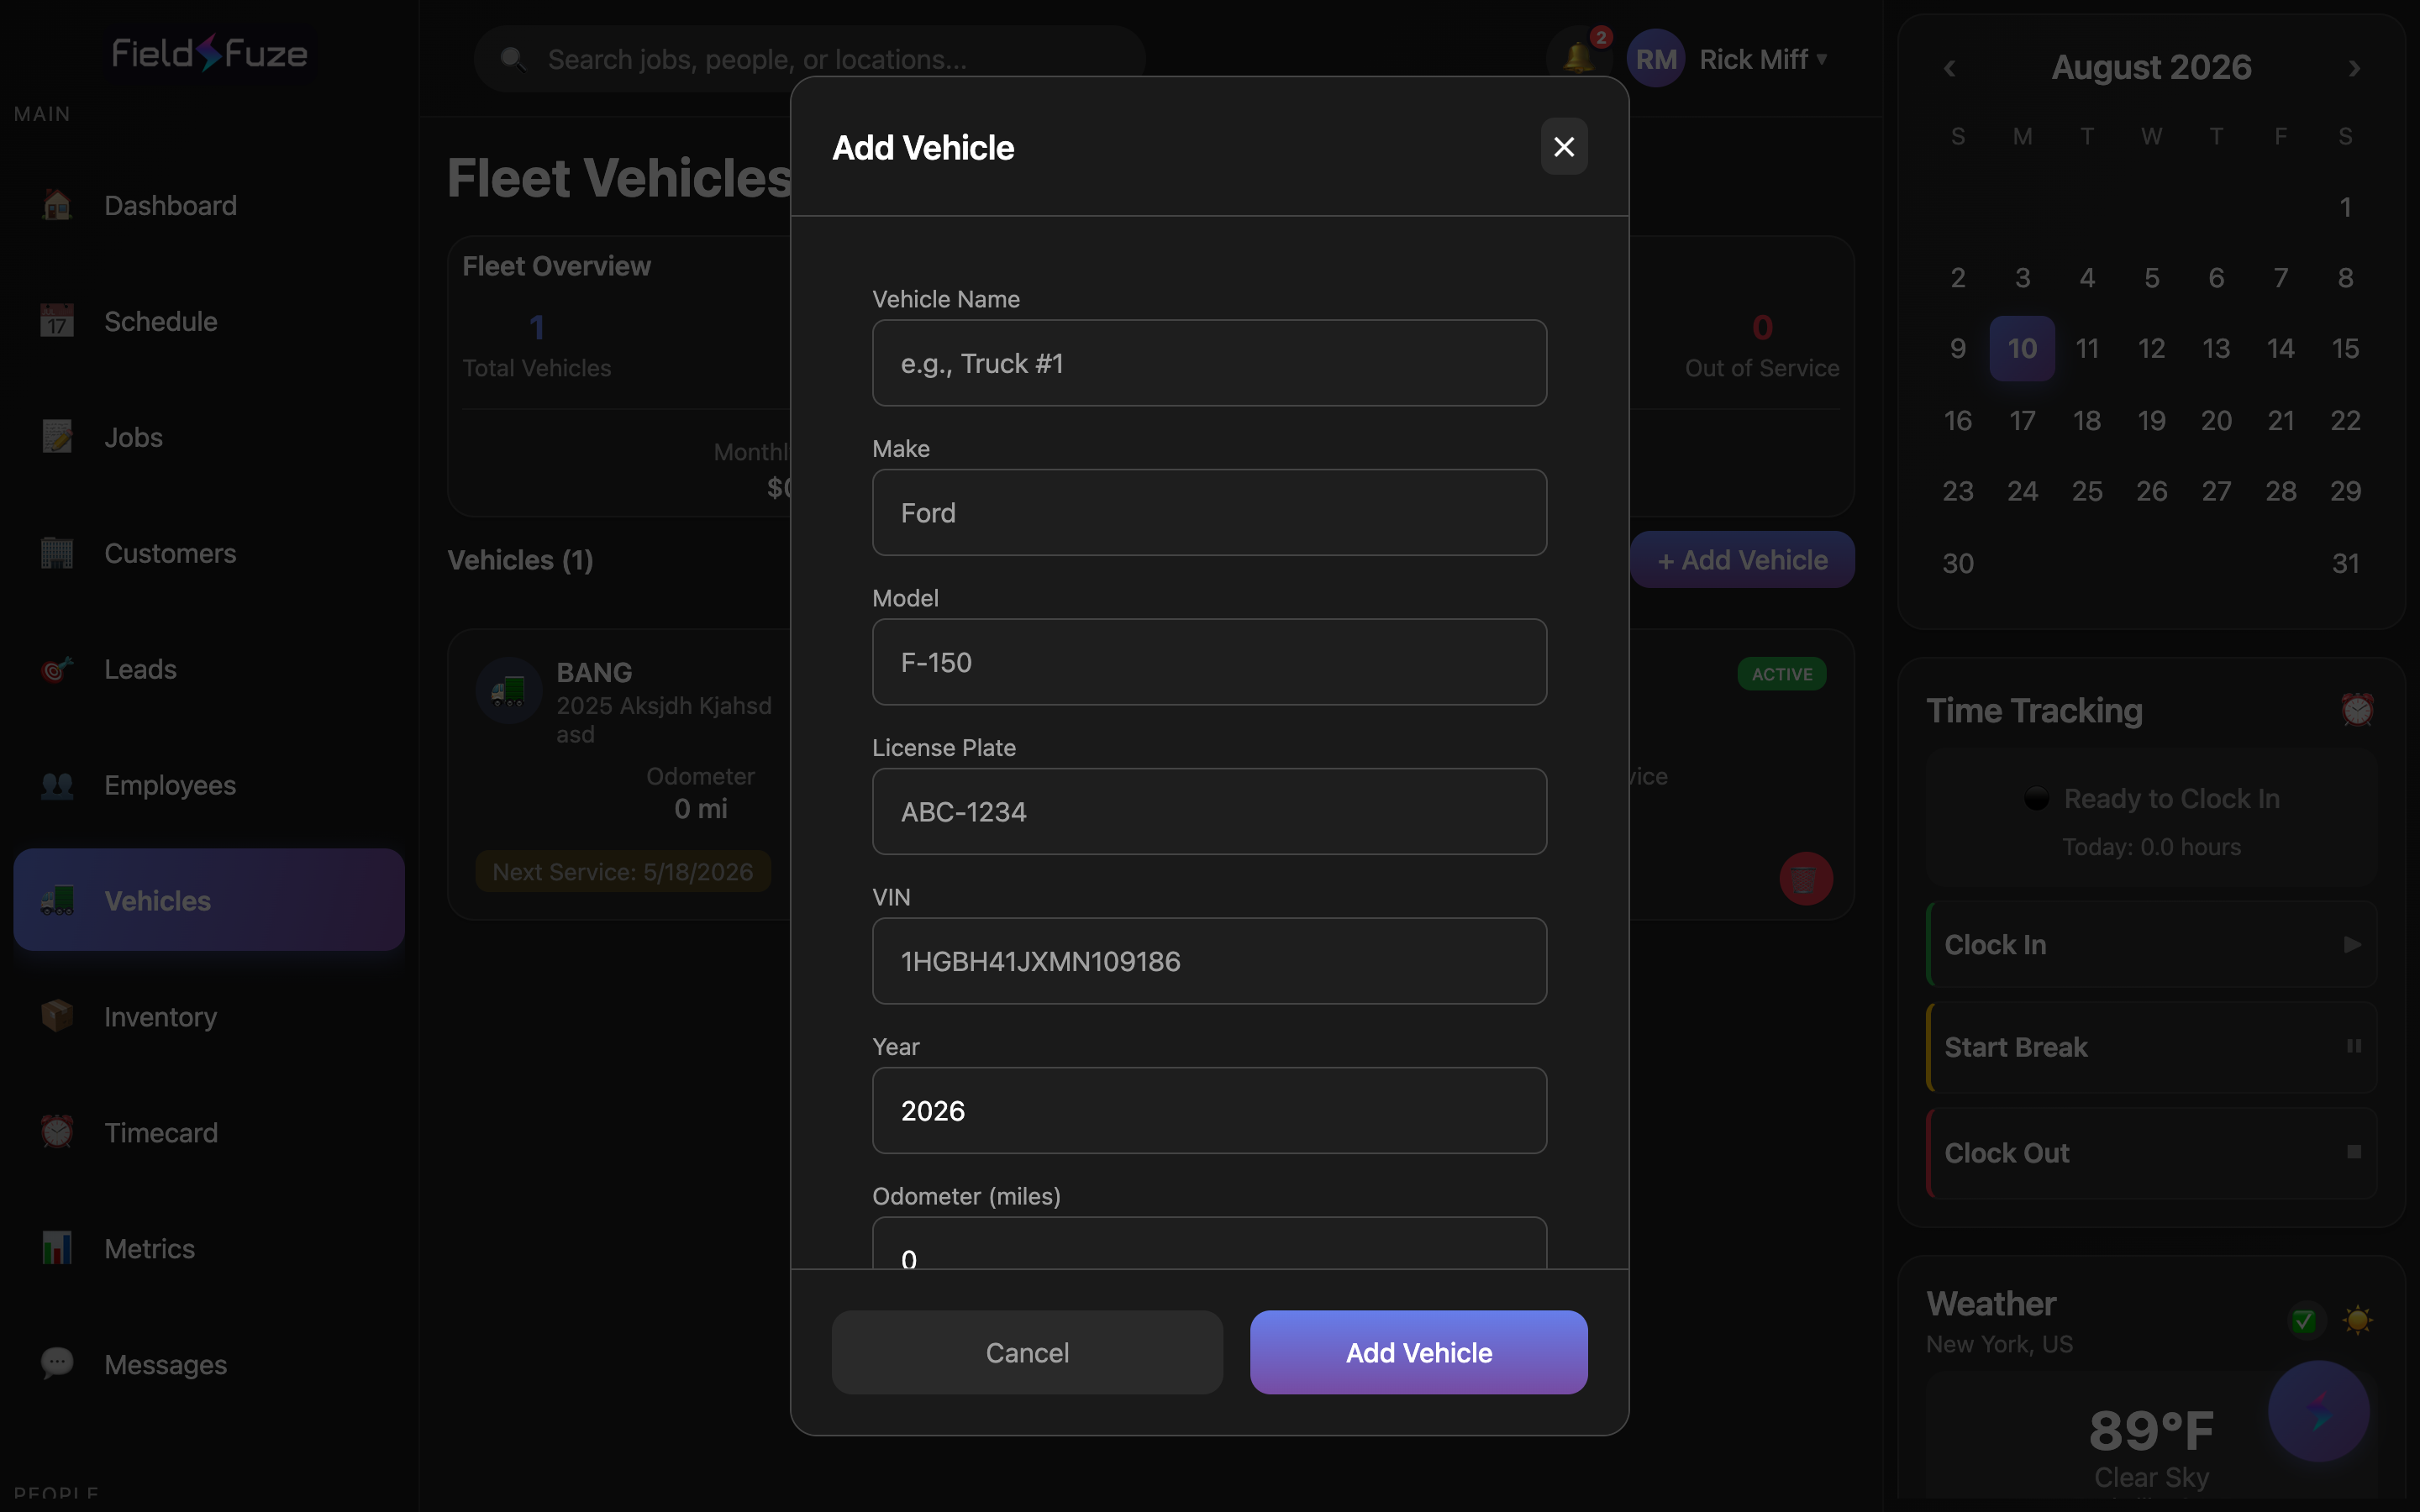
- Click + Add Vehicle.
- Enter a Vehicle Name (e.g., "Truck #1"), the Make (e.g., Ford), and the Model (e.g., F-150). These three get your vehicle on the board.
- Fill in the rest to make the record complete: License Plate, VIN (auto-uppercased, up to 17 characters), Year, current Odometer in miles, and Color.
- Click Add Vehicle. It appears in your fleet immediately.
New vehicles start with a fuel type of gasoline and a type of truck by default — you can adjust both from inside the vehicle. Vehicle types each get their own icon on the fleet cards: 🚛 truck, 🚐 van, 🛻 pickup, 🚗 SUV, and 🚚 trailer. Supported fuel types are gasoline, diesel, electric, and hybrid.
Inside a vehicle
Tap any vehicle card to open its full record. At the top you'll see Vehicle Information with a helpful reminder: "Tap any field to edit. Changes save automatically." Every field here — Name, Make, Model, Year, License Plate, VIN, Color, and Odometer — is tap-to-edit and saves on its own the moment you finish. The Last Service date is calculated automatically from your maintenance records, so it's always accurate. You can also update the Status and Fuel Type right here.
Service reminders compare your current odometer against each interval, so an up-to-date odometer means accurate "due" alerts. Update it here anytime, and every fuel or maintenance entry also lets you record the reading at that moment.
Assigning a vehicle to an employee
Assigning vehicles keeps everyone accountable for the truck they drive and makes fuel and mileage entries fall into place.
- In the vehicle, find the Assignment section and tap the Assigned To value (it reads Unassigned until you set it).
- Search your team by name or email and pick the driver.
- Click Assign to Vehicle. The driver's name now shows on the vehicle card and record.
Once a vehicle is assigned, fuel purchases default to that driver as the person who bought them, saving a step every time. Manage your drivers under Team.
Service schedule & reminders
Each vehicle has a Service Schedule where you set the Next Service Date and Next Service Mileage — pick a date on the calendar and type the odometer target. These feed the "next service" info shown on the fleet card.
Service reminders (with presets)
Under Service Reminders, click + Add Reminder and choose a preset — the mileage and month intervals fill in for you, and you can fine-tune either one:
- Oil Change — every 5,000 miles or 6 months
- Tire Rotation — every 7,500 miles or 6 months
- Vehicle Inspection — every 12 months
- Air Filter Change — every 15,000 miles or 12 months
- Brake Service — every 30,000 miles or 24 months
- Custom — name your own reminder and set any mileage and/or month interval
Each active reminder shows its cadence ("Every 5,000 mi or 6 months"), the odometer it was last completed at, and a live status badge: OK while there's mileage to go, and DUE once the current odometer has passed the last-completed reading plus the interval. Because the badge is driven by the live odometer, staying on top of oil changes and inspections is as simple as glancing at the list.
Maintenance records
Log every service in the Maintenance Records section so you have a full repair history and accurate monthly costs. Records are listed newest-first and each shows its date, the odometer reading, who performed it, the cost, and a Complete or Scheduled badge.
Adding a service record
- In the vehicle, click + Add Service under Maintenance Records.
- Enter a Service Description (e.g., "Oil Change", "Brake Service", "Annual Inspection") and optional detailed Description notes.
- Set the Service Date, and record Performed By (shop or technician), the Cost, the Odometer Reading, and Labor Hours.
- List any Parts Used — just type them comma-separated (e.g., "Oil Filter, 5W-30 Oil (5qt)").
- Optionally set a Next Service Due date and Next Service Odometer — handy quick buttons drop in 3 Months, 6 Months, or 1 Year in a tap.
- Attach paperwork under Service Paperwork — upload invoices, receipts, or service documentation. Both PDFs and images are supported and open with one tap right from the record.
- Save the record. It appears at the top of the history and rolls into your monthly maintenance total.
Records can be edited or removed later from the ⋯ menu on each one, and you can add more documents or clear an attachment whenever you need to.
Attaching the shop invoice or receipt to each service turns FieldFuze into your fleet's paper trail — warranty claims, resale documentation, and tax time all get easier when the paperwork lives right on the vehicle.
Fuel expenses
Track every fill-up in the Fuel Expenses section to see exactly what each truck costs to run. A running This Month's Fuel Cost total sits at the bottom of the section and feeds the fleet-wide Monthly Fuel figure on your overview.
Logging a fuel purchase
- Click + Add Fuel under Fuel Expenses.
- Enter the Total Amount ($) and the Gas Station (e.g., Shell, Exxon).
- Record Gallons and the Odometer Reading at the pump.
- If the vehicle isn't assigned to a driver, note who it was Purchased By — for assigned vehicles this fills in automatically.
- Save. The entry lists the station and gallons, and the month's total updates instantly.
Each fuel entry can be edited or deleted later from its ⋯ menu, so correcting a typo or removing a duplicate is quick.
Per-truck parts inventory
Every vehicle carries its own Vehicle Inventory — the spare parts and materials stocked on that truck. It's perfect for the wire nuts, bolts, fittings, and consumables your crews keep on board so a job never stalls for a $2 part.
Adding a stocked part
- In the vehicle, click + Add Item under Vehicle Inventory.
- Enter the SKU / Part Number (e.g., "WN-001", "BLT-58") and the Quantity on hand.
- Give it an Item Nickname your crew will recognize (e.g., "Wire Nuts (Yellow)", "5/8 Bolts").
- Set the Storage Location so anyone can find it — type your own or tap a quick location like Front toolbox, Side compartment, Rear compartment, Tool tray, or Roof rack.
- Add a Vendor (Where to Order) so restocking is one lookup away (e.g., Home Depot, Grainger, local supplier).
- Click Add Item. Parts are listed alphabetically by nickname, each showing its SKU, location, and vendor.
Items can be updated anytime from the vehicle. For your warehouse or shop stock, purchase orders, and supplier catalogs, head to Inventory — the on-truck list here is dedicated to what rides along with the vehicle.
Insurance & registration
Keep each vehicle's paperwork on file in the Insurance & Registration section so renewal dates never sneak up on you:
- Insurance Provider — e.g., State Farm
- Policy Number — e.g., POL-12345
- Insurance Expiry — pick the date on the calendar
- Registration Expiry — pick the date on the calendar
Like the rest of the vehicle record, these fields save automatically as soon as you set them.
Ways teams use this
- Never miss an oil change — add the Oil Change preset once and let the DUE/OK badge tell you when each truck needs service, based on its live odometer.
- Know your true cost per truck — log fuel and maintenance as they happen and read the monthly spend right off the Fleet Overview.
- Hold drivers accountable — assign each vehicle to an employee so fuel purchases and mileage tie back to the right person.
- Build a resale-ready history — every service, with its receipt attached, stays on the vehicle for warranty claims and resale value.
- Stop losing jobs to missing parts — stock each truck's on-board inventory with SKUs, locations, and vendors so crews grab what they need and reorder in a tap.
- Stay road-legal — file insurance and registration expiry dates so renewals are always on your radar.
Service reminders are based on mileage against the odometer, so keep the odometer current for accurate "due" alerts — and remember every fuel and maintenance entry can capture the reading at that moment to help.