📋 Job Details & Overview
Opening a job reveals a tabbed workspace with everything about that job. The Overview tab is home base — it holds the job's identity (title, status, priority, type), the property and client, recurring settings, and the stage plan that drives your Schedule.
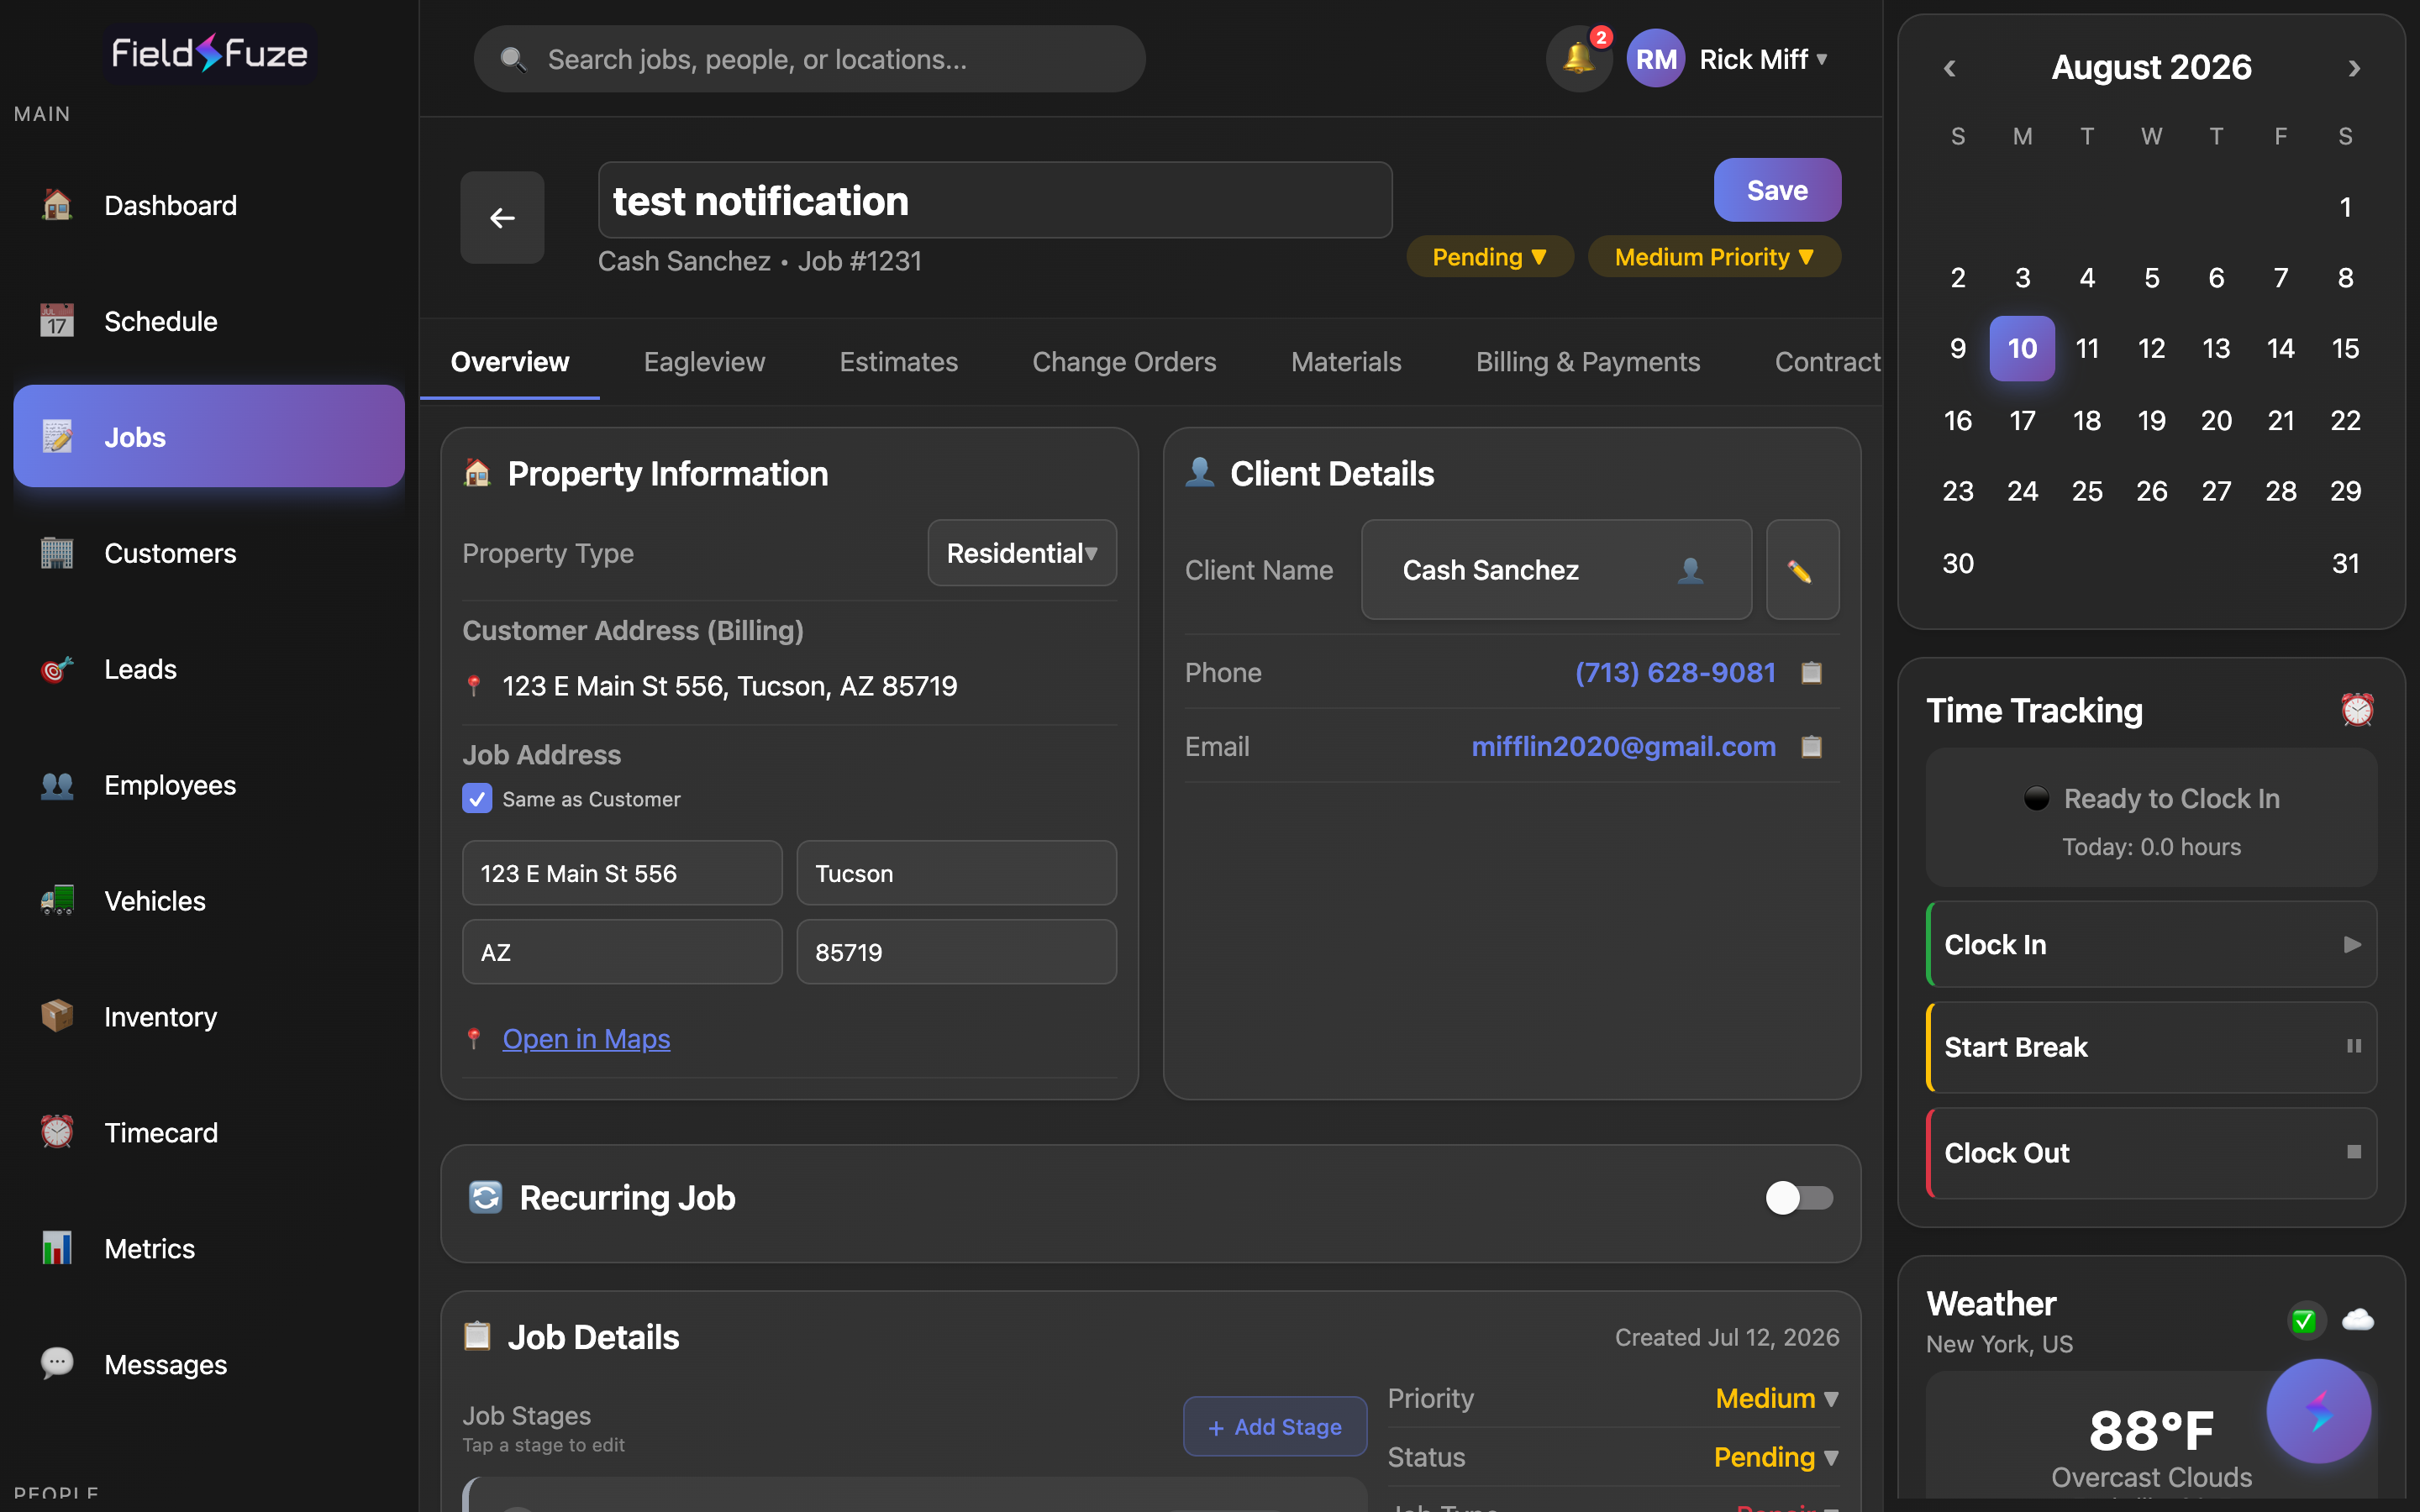
The job header
The header sits above every tab, so the job's identity and state travel with you no matter which tab you're on. It shows the editable title, the customer name and job number underneath, a Save button, and quick-tap Status and Priority badges.
- Title — tap the title to rename the job inline (it selects the text for you). The line below shows the customer and Job # so you always know which job you're in.
- Status badge — Pending, In Progress, Completed, or Cancelled, color-coded and tappable. Picking a status applies it right away — no separate save needed.
- Priority badge — Low, Medium, or High, shown as "[Level] Priority" and saved the moment you choose it.
- Save — commits everything else you've edited on the job (title, address, notes, job type, and the like) in one tap.
- Restore Job — on a cancelled job, a Restore Job button appears in the header to bring it back (see Status flows below).
Because the Status and Priority badges save as soon as you tap them, you can update a job's state from the header in a single tap and move on — handy when you're marking jobs In Progress on the way out the door or bumping a hot job to High priority. The rest of your edits ride along on the next Save.
The tabs
Across the top is the tab bar. Overview and Photos are always there; the others appear as they become relevant to the job and your role, so the workspace stays focused.
- Overview — home base: title, status, priority, type, property, client, recurring, and stages.
- EagleView — order and view aerial roof measurements once EagleView is connected.
- Estimates — build priced quotes and send them for e-signature. See Estimates.
- Change Orders — add approved scope after the estimate is signed.
- Materials — appears once the job has purchase orders, so you can track what's been ordered.
- Billing & Payments — invoices, payment links, and the running balance. See Billing & Payments.
- Contracts — signed contracts, terms, and supporting documents. See Contracts & Documents.
- Photos — every photo captured for the job, organized by category. See Job Photos.
The bar shows exactly what this job needs. Materials surfaces once purchase orders exist, an Insurance tab joins the row on insurance jobs, and financial tabs like Estimates and Billing & Payments appear if your role includes viewing financials. Integration-powered tabs like EagleView show once that integration is connected. Everyone always has Overview and Photos.
The Overview tab
Below the header, the Overview body is where the job's core record lives. It's laid out as two cards — Property Information and Client Details — followed by the recurring toggle, a details column (Priority, Status, Job Type), an Internal Job Notes field, and the Job Stages planner.
Property Information
- Property Type — flip between Residential and Commercial from the dropdown.
- Customer Address (Billing) — the customer's billing address, shown for reference with a 📍 pin.
- Job Address — the work-site address in a tidy Street · City · State · Zip grid, editable right on the card.
- Same as Customer — tick this to copy the customer's address into the job address in one move; untick to type a different work site.
- 📍 Open in Maps — appears once a street is entered and opens turn-by-turn directions to the job site using whatever you've typed, even before you save. It routes to the job address, so crews always head to the work site.
Keeping the job address separate from the billing address means Open in Maps always sends your crew to where the work actually happens. When the two are the same, just tap Same as Customer and the job address fills itself in.
Client Details
- Client Name — the customer on the job. Use 👤 to pick or reassign the job to a different customer, and the ✏️ pencil to edit this customer's contact details.
- Phone — on web, the number is selectable, tapping it starts a call, and a 📋 copy button is right there. On mobile, tapping opens a quick action sheet with Call, Text, and Copy Number.
- Email — on web, tap to compose or use the 📋 copy button. On mobile, tapping opens Send Email and Copy Email options.
- Insurance — shown when the customer has an insurance carrier on file.
Because phone and email are click-to-act, you can call, text, or email the customer straight from the job — no copy-pasting into another app. On a phone, the action sheet lets you choose Call or Text for the same number, so confirming an appointment by text is a two-tap job.
Priority, Status & Job Type
A details column repeats the Priority and Status pickers (matching the header badges) and adds the Job Type selector:
- Priority — Low, Medium, or High.
- Status — Pending, In Progress, Completed, or Cancelled.
- Job Type — Repair, Replacement, Installation, Temp Panel Rental, or Snow Removal. Type saves on the next Save.
- Internal Job Notes — a private notes field for crew and office context that stays off customer-facing documents.
Status flows
Changing the job's status can trigger a helpful prompt so nothing gets missed:
Completing a job
- Set the status to Completed.
- If approved estimates used inventory parts, FieldFuze offers to deduct the used inventory so your stock stays accurate — confirm to complete.
- If Send Review Request is on, FieldFuze can email the customer a review request once the job is fully paid, turning finished work into fresh reviews automatically.
On the Overview tab, the Send Review Request toggle asks FieldFuze to email the customer a review request when the job is fully paid. You can also send one on demand — the confirmation tells you exactly which email (and, where enabled, which number) it's going to.
Cancelling a job
- Set the status to Cancelled.
- Pick a reason — Customer changed mind, Project no longer needed, Customer went with competitor, Unable to complete work, Payment dispute, Scheduling conflict, or Other (with a note).
- If the customer has already paid, choose how you'll handle the refund — Cash, Check, Bank transfer, Credit card, Store credit, or No refund — and optionally sync it to QuickBooks.
Restoring a job
Cancelled a job by mistake, or the customer came back? Tap Restore Job in the header, choose the status to bring it back to, and keep its payments and estimates — with an option to sync the restore to QuickBooks.
Recurring jobs
Turn on Recurring Job on the Overview tab to repeat the work automatically. Great for maintenance plans, seasonal service, and any customer you visit on a rhythm.
- Frequency — Daily, Weekly, Every 2 Weeks, or Monthly.
- Day — pick a day of week for weekly / every-2-weeks, or a day of month for monthly.
- Start Date — when the series begins.
- End Date (Optional) — set an end, or leave it None – Ongoing to run indefinitely.
- Save Settings — stores the schedule; FieldFuze shows the Next Scheduled Job date so you always know what's coming.
- Pause / Resume — an active series shows Pause Recurring (a PAUSED badge appears, and you can Resume anytime); no new visits are created while paused, and existing visits stay put.
A quarterly gutter clean or a monthly service visit only needs to be configured once — pick Monthly on the 1st, set a start date, leave the end open, and FieldFuze keeps generating the next visit for you. Recurring settings live on the parent job, so managing the whole series is always one place.
Working with job stages
Stages break one job into the phases real work actually happens in — so a multi-day or multi-crew job stays organized. For example a re-roof might be Tear-off → Dry-in → Shingle → Cleanup, or a remodel Demo → Rough-in → Finish. With stages you can schedule each phase on its own day, assign a different crew to each, track progress (a job shows "Stage 2/4"), and complete phases one at a time. Simple one-visit jobs work great as a single stage.
The Job Stages planner sits at the bottom of the Overview tab. Each stage is a card showing its number, name, status, schedule, and who's assigned; tap a card to edit it, or + Add Stage to plan another phase.
What a stage holds
- Name — label the phase (e.g. Setting, Finishing, Phase 1). Saved stage names appear as one-tap chips so your crew names stay consistent; leave it blank to show just the job title on the calendar.
- Color — pick from the stage color palette so each phase is easy to spot on the Schedule. Matching a saved name auto-picks its color.
- Schedule — a Start Date, optional End Date, and Start & End Time. Add an end date and the stage becomes multi-day — set the same daily hours across the span, or open custom hours to fine-tune each day. FieldFuze shows a handy "N-day stage" badge and totals the hours for you.
- Assignee — Assign To a whole crew, or pick one or more individuals — whichever fits the phase.
- Status — Draft, Scheduled, In Progress, Completed, or Cancelled, each color-coded on the card.
- Notes — a short note preview right on the card.
Adding a stage
- Tap + Add Stage.
- Give it a name and color (or tap a saved chip).
- Set the schedule — start date and time, plus an end date for a multi-day phase.
- Under Assign To, choose a crew or add individuals.
- Save. The stage joins the list and lands on the Schedule as its own block.
Every job keeps at least one stage. When you add the first extra stage to a simple job, FieldFuze converts it to multi-stage and turns the job's current schedule into Stage 1 — you just name that existing work, then add the new phase. Nothing you'd already scheduled is lost.
Completing stages
Each stage has a Complete button, so you close out phases one at a time as the crew finishes them. When every stage is completed, FieldFuze automatically marks the whole job Completed and lets you know — so the job's status always reflects what's really done in the field.
On the Schedule, each stage is its own block, so different phases can sit on different days with different crews — a Tear-off crew on Monday and a Shingle crew on Wednesday, all under one job. Assigning crews or individuals per stage means the right people see the right work on their calendar.
Use cases
- Quick job triage — from the header, bump a storm-damage job to High priority and flip it to In Progress in two taps, then call the customer straight from Client Details.
- Multi-day re-roof — plan Tear-off → Dry-in → Shingle → Cleanup as color-coded stages, assign a crew to each, and watch the job auto-complete when the last stage is done.
- Maintenance contract — set Monthly recurring on the 1st with no end date so every visit is created for you; pause it over a slow season and resume when work picks back up.
- Clean completion — mark the job Completed, let FieldFuze deduct the inventory the estimate used, and send a review request once it's paid.