📦 Inventory
Track the parts and materials you keep on hand, know what everything is worth, protect your margins, and restock in a couple of clicks — all in one place.
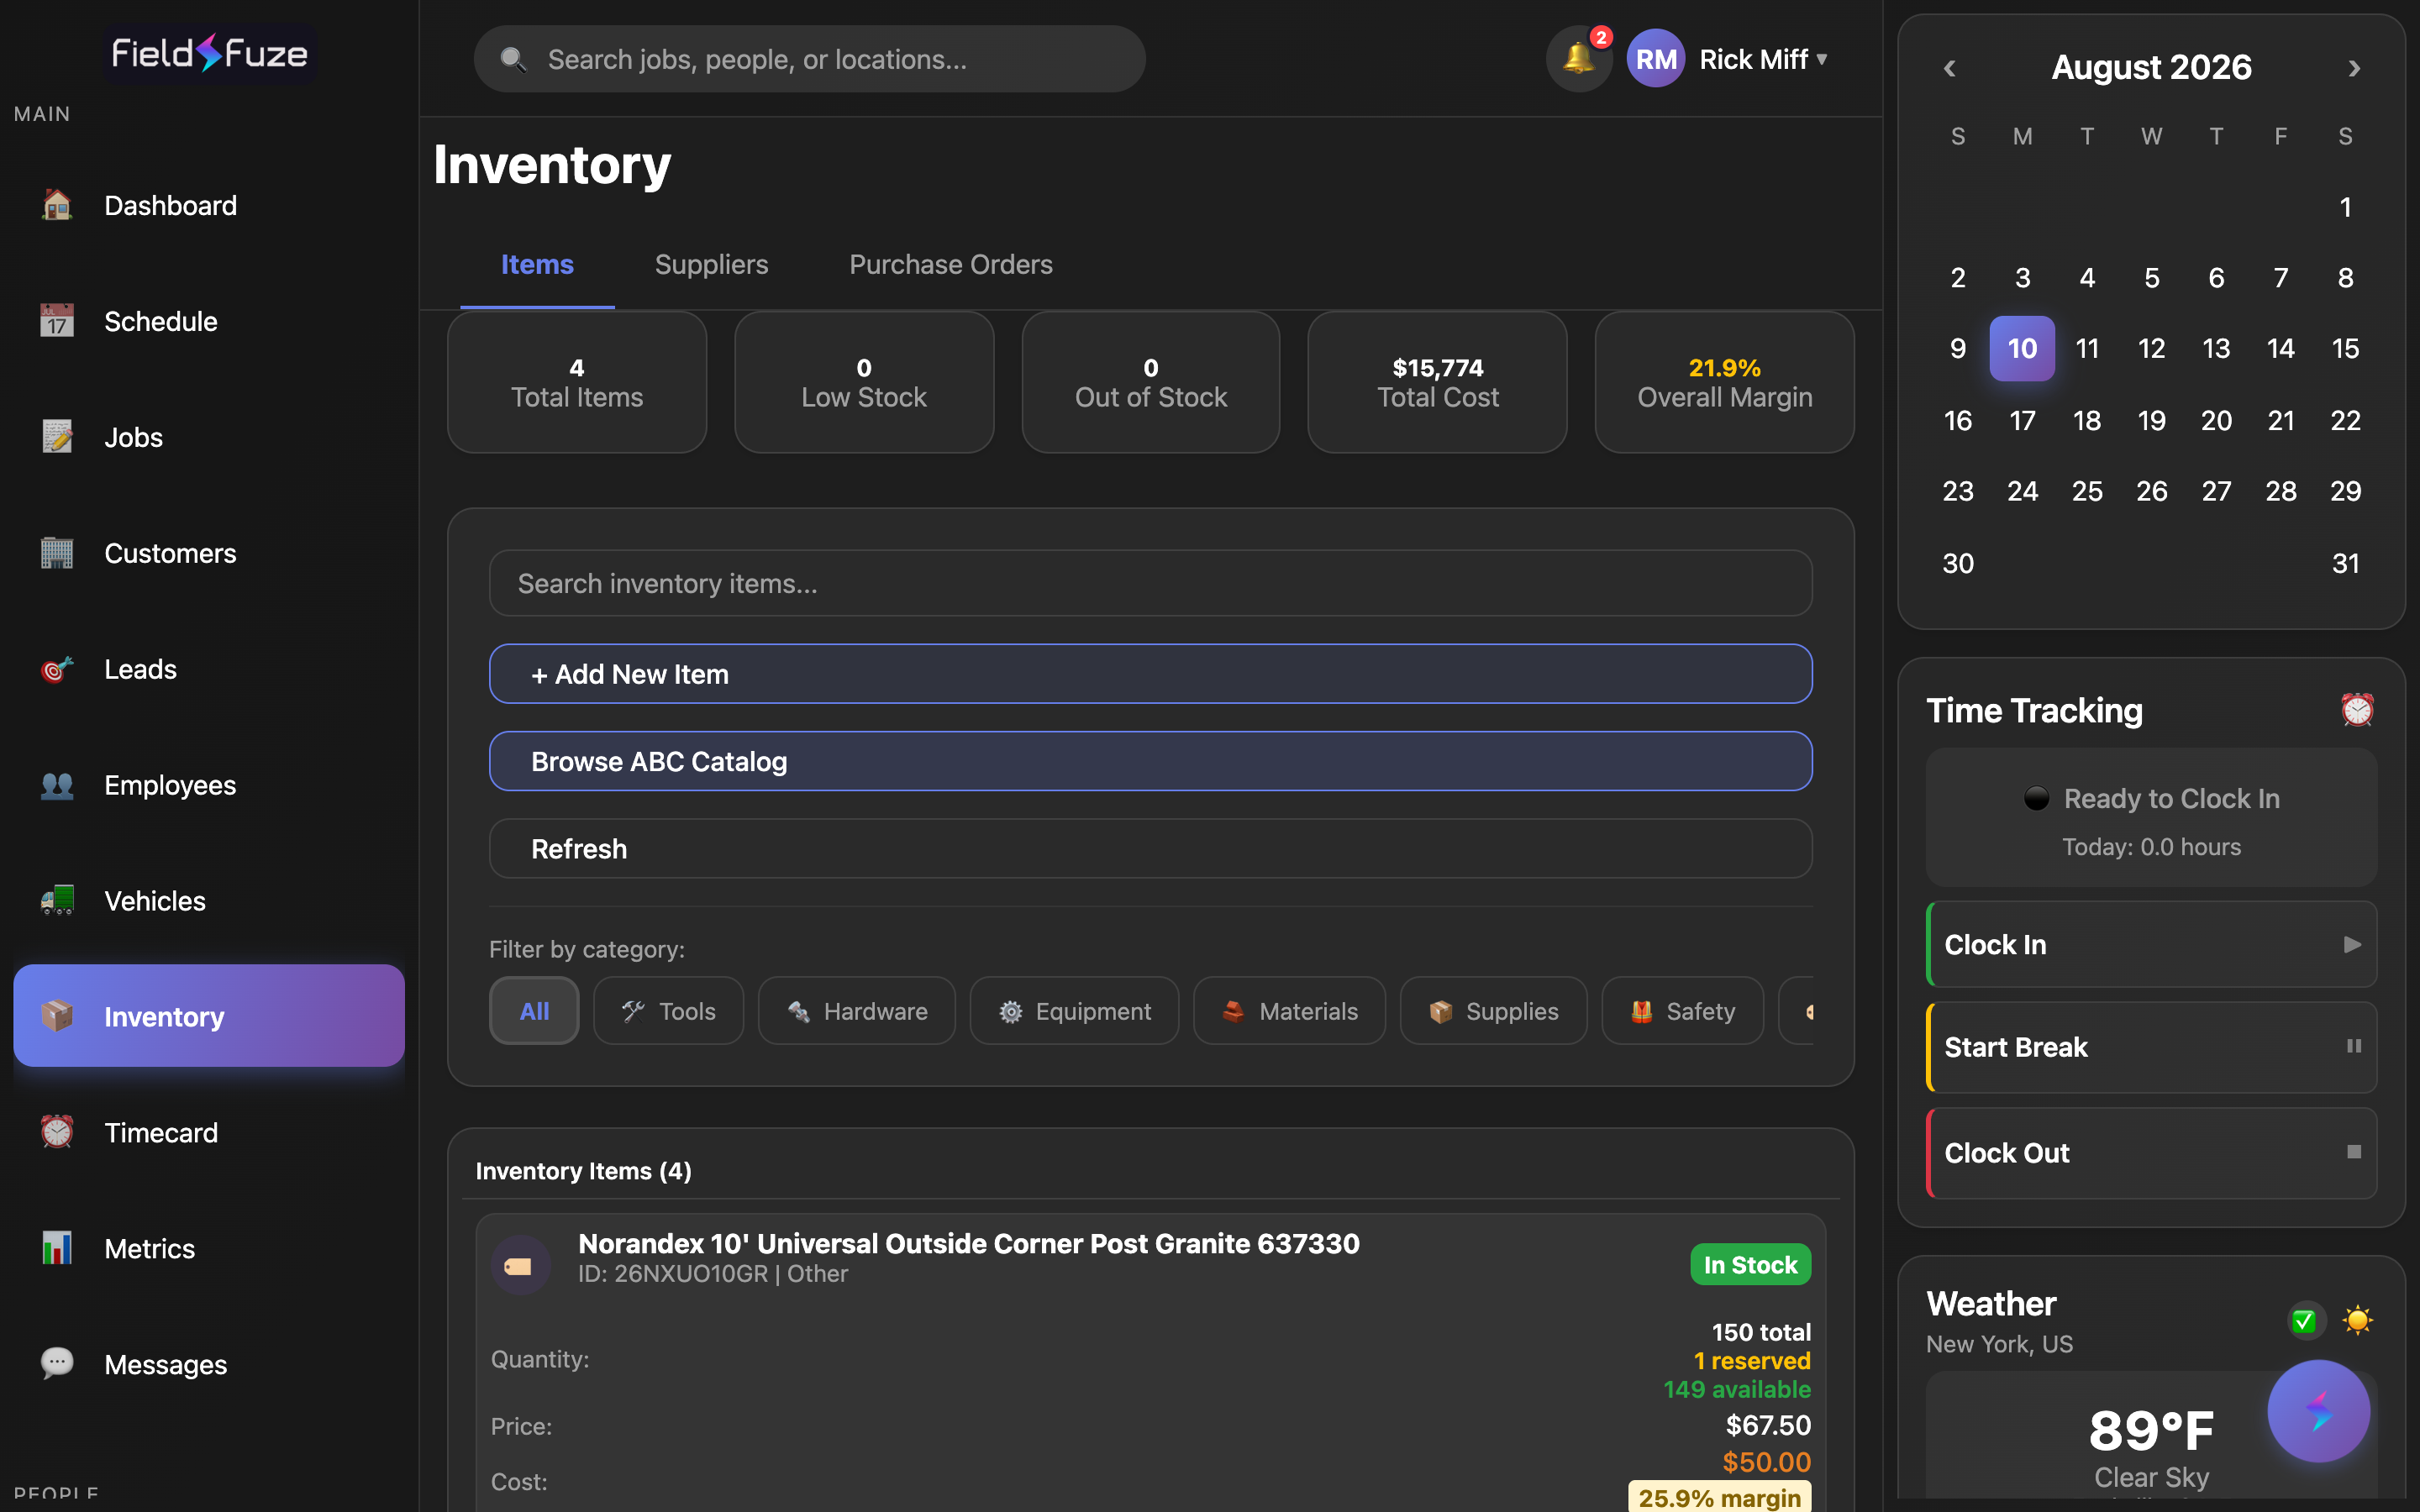
The Inventory area is organized into three tabs that work together: Items is your live stock list with value and margin stats, Suppliers is your vendor address book, and Purchase Orders is how you restock and keep costs accurate. Everything you do in one tab flows into the others — add a supplier, order from them, receive the shipment, and your on-hand counts and average costs update automatically.
- Switch between the Items, Suppliers, and Purchase Orders tabs from the tab bar at the top.
- See your whole catalog at a glance with a live stat row: Total Items, Low Stock, Out of Stock, Total Cost, and Overall Margin.
- Track both a sell price and a unit cost per item so every line shows its own color-coded profit margin.
- Group items into categories (Tools, Hardware, Equipment, Materials, Supplies, Safety, Other) and filter the list instantly.
- Watch total, reserved, and available quantities so committed stock never gets double-sold.
- Build purchase orders to restock — including one-click adding of everything that's low — and receiving a PO updates stock plus your average cost automatically.
- Search any item by name or ID, and pull items straight from a connected supplier catalog with live wholesale pricing.
The stat row
Across the top of the Items tab, a row of cards summarizes your entire inventory in real time. As you add items, sell stock, or receive shipments, these numbers recalculate on the spot.
- Total Items — how many distinct products you're tracking.
- Low Stock — items at or below their reorder point. When any item is low, this card highlights in amber so it's impossible to miss.
- Out of Stock — items with nothing available. This card turns red the moment a count hits zero, so you know before a customer does.
- Total Cost — the total value of on-hand stock at what you paid for it (quantity × unit cost). This is the number that reconciles with your books.
- Overall Margin — your blended profit margin across every item that has a cost set. It's color-coded green at 30% and up, amber from 15–30%, and red below 15%, so your pricing health reads at a glance.
- Missing Cost — appears only when one or more items still need a unit cost. It's a gentle nudge: fill those in and your Overall Margin becomes a complete picture.
Add a unit cost to every item and the Missing Cost card disappears — at that point your Total Cost and Overall Margin reflect 100% of your catalog. That's the sweet spot for accurate job costing and clean books.
The Items tab
The Items tab lists every product you stock in a clear table: item name and category, quantity, reorder point, sell price, unit cost with its margin badge, status, and when it was last updated. A colored status badge on each row makes stock health obvious at a glance.
Use the search box to find any item by name or ID, and the category filter chips to narrow the list to just Tools, Materials, Safety, and so on. Pull to refresh (or tap Refresh) any time to pull the latest counts.
Adding an inventory item
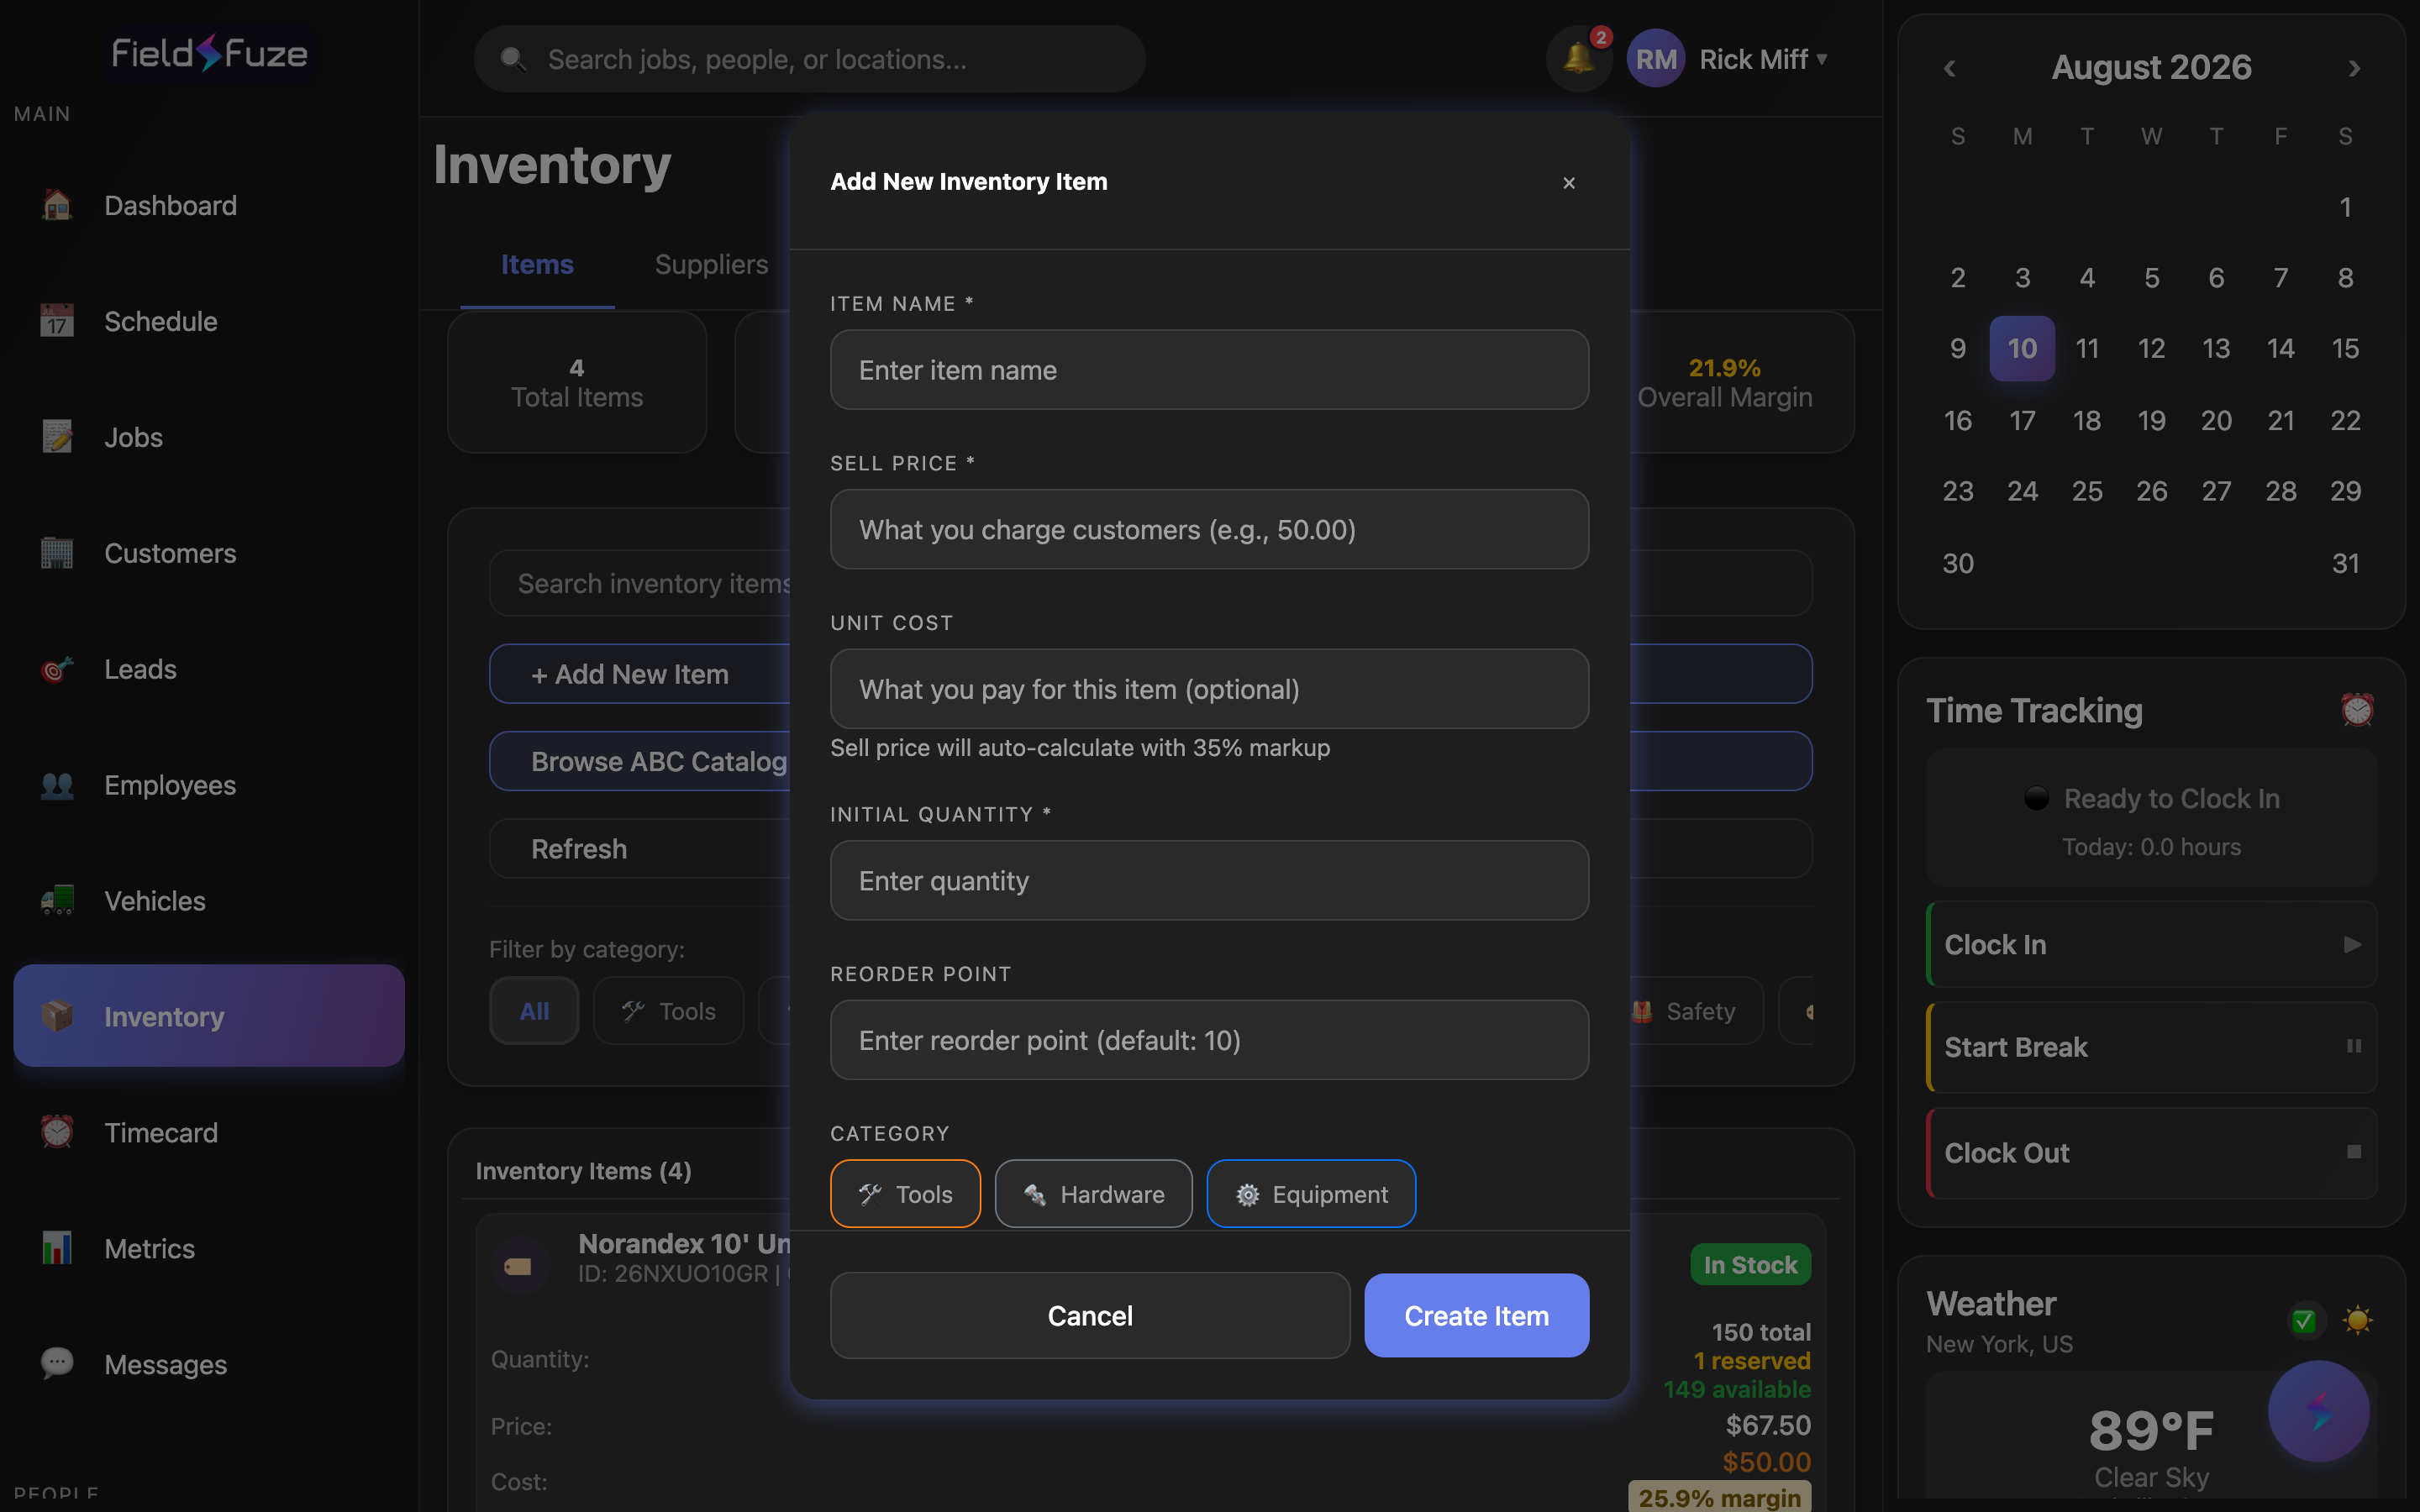
- Click + Add New Item to open the form.
- Enter the Item Name, the Sell Price (what you charge customers), and an Initial Quantity — these three are all that's required to get started.
- Add a Unit Cost (what you pay for the item) to unlock margin tracking. As soon as both prices are present, a live badge shows the item's margin and markup so you can price with confidence before you save.
- Set a Reorder Point — the level at which the item flags as low stock (defaults to 10 if you leave it blank).
- Pick a Category from Tools, Hardware, Equipment, Materials, Supplies, Safety, or Other.
- Optionally choose a Preferred Supplier and enter that supplier's Item # so reordering is one click later.
- Add a SKU / Item ID if you use your own part numbers (optional — an ID is generated automatically if you skip it).
- Click Create Item. It appears in your list immediately and is ready to use on jobs and estimates.
Auto-markup: price from cost in one step
When you turn on auto-apply markup and set a default markup percentage in your inventory settings, the Sell Price fills itself in the instant you type a Unit Cost. Enter a $40 cost with a 30% default and the sell price snaps to $52.00 for you. It's a starting point, not a cage — type over the sell price any time and your manual number sticks.
Margin is profit as a share of the sell price — a $100 item that costs $70 has a 30% margin. Markup is profit as a share of the cost — that same item carries a 42.9% markup. FieldFuze shows both on the add and edit forms so you can price by whichever measure your business runs on.
Stock tracking: total, reserved, and available
Every item tracks three quantities so committed stock is never accidentally promised twice:
- Total — everything physically on your shelf.
- Reserved — quantity already committed to open estimates and jobs.
- Available — what's genuinely free to sell (total minus reserved).
When an item has reservations, the row breaks the number out into total, reserved, and available so you always see the true picture. Reservations release automatically as work moves forward, keeping available honest without any manual bookkeeping.
Low-stock reordering
Any item at or below its Reorder Point is flagged Low Stock — on its row, in the amber stat card, and, best of all, inside the purchase-order builder where you can add every low item to a PO with a single tap (see below). Set thoughtful reorder points once and FieldFuze does the watching for you.
Margins at a glance
On each item row, the unit cost shows alongside a color-coded margin badge — green for 30%+, amber for 15–30%, red below 15% — so a quick scan tells you which products are pulling their weight and which need a pricing look. The blended Overall Margin stat rolls all of these up into one headline number.
The Suppliers tab
Suppliers is your vendor address book, and it's the foundation for purchase orders. Every supplier you add becomes selectable as a preferred supplier on items and as the vendor on a PO.
Adding a supplier
- On the Suppliers tab, click + Add Supplier.
- Enter the supplier Name (e.g., Home Depot, ABC Supply) and, optionally, a Contact, Email, Phone, Address, and Website.
- Set Payment Terms — tap a preset (Net 30, Net 15, Net 60, COD, Due on Receipt) or type your own custom terms.
- Add your account number with that supplier and any notes, then save.
Each supplier card shows its contact details, payment terms, and a live open POs count so you can see who you currently have orders out with. Filter the list by Active, Archived, or All, and search by name any time.
Save payment terms on each supplier and they travel with every purchase order you create for that vendor — no re-typing, and your team always knows when a bill is due.
The Purchase Orders tab
Purchase Orders are how you restock and — just as importantly — how you keep your costs accurate. A PO starts as a draft, moves through sent, and finishes as received (or partial along the way), with a clear color-coded status on every card. Filter by status to see exactly what's outstanding.
Creating a purchase order
- On the Purchase Orders tab, click + Create PO to open the three-step builder.
- Step 1 — Select Supplier. Search and pick the vendor you're ordering from.
- Step 2 — Add Items. Add items manually, or click + Add Low Stock Items to pull in everything that's below its reorder point in one move — FieldFuze even suggests an order quantity that brings each item comfortably back above its reorder point.
- Adjust quantities and unit costs, set an optional Expected Delivery Date and notes.
- Step 3 — Review and save. The order is created as a draft, ready to send to your supplier.
Use + Add Low Stock Items at the start of each week: pick a supplier, add their low-stock items in one tap, review, and your restock order is done in under a minute.
Receiving a purchase order
When a shipment arrives, receiving it is where the magic happens — your on-hand counts go up and your costs stay honest, automatically.
- Open the purchase order and choose Receive Items.
- Each line shows what was Ordered, Already Received, and Remaining. Confirm the Receiving Now quantity for each line.
- If the price on the invoice differs from the PO, update the Unit Cost — the line highlights and reminds you what the PO cost was, so nothing slips through.
- Confirm. Inventory quantities and costs update instantly.
Receiving raises each item's on-hand quantity by what you received and blends the new price into a weighted-average cost — so if you bought 10 at $5 and later receive 10 at $7, your cost basis becomes $6, not just the latest number. That keeps your Total Cost and every margin figure grounded in what you actually paid. You can receive an order in full or in partial deliveries, and the status tracks right along with it.
Because receiving updates your average cost automatically, your job-costing and margin numbers stay accurate as supplier prices move over time — no spreadsheets, no manual re-costing.
Browse a supplier catalog to import items
Once ABC Supply is connected, a Browse ABC Catalog button appears on the Items tab. Use it to pull products straight from the ABC catalog — complete with live wholesale pricing for your branch — instead of typing items in by hand.
- Click Browse ABC Catalog and search the catalog. If your account has multiple branches, switch branches to price against the location you order from.
- Pick an item. FieldFuze prefills the Add Item form with the item's name and number, its live wholesale cost, and a sell price calculated from your default markup — already linked to your ABC supplier.
- Set your initial quantity and reorder point, adjust anything you like, and click Create Item.
See Ordering from Suppliers for connecting ABC Supply and ordering directly.
Ways teams use it
Accurate job costing
Because each item carries a real unit cost (kept current by receiving), the materials you pull onto a job cost at what you actually paid. Reservations hold stock against open estimates so your available numbers reflect reality, and your margins on every job start from solid ground. Pair inventory with Materials on a job to turn stocked parts into billable line items.
Effortless restocking
Set reorder points once, then let the Low Stock flags and the + Add Low Stock Items button drive a clean weekly restock: pick a supplier, add their low items, review, send. When the delivery lands, receive it and your counts and costs are current again — no re-entry.
Pricing that protects margin
The color-coded margin badges and blended Overall Margin stat make it easy to spot thin-margin items and reprice with intent. And when you want the full financial picture across jobs, see how it rolls up in Business metrics.