👥 Employees & Crews
Manage your people, their roles, and the crews you schedule together.
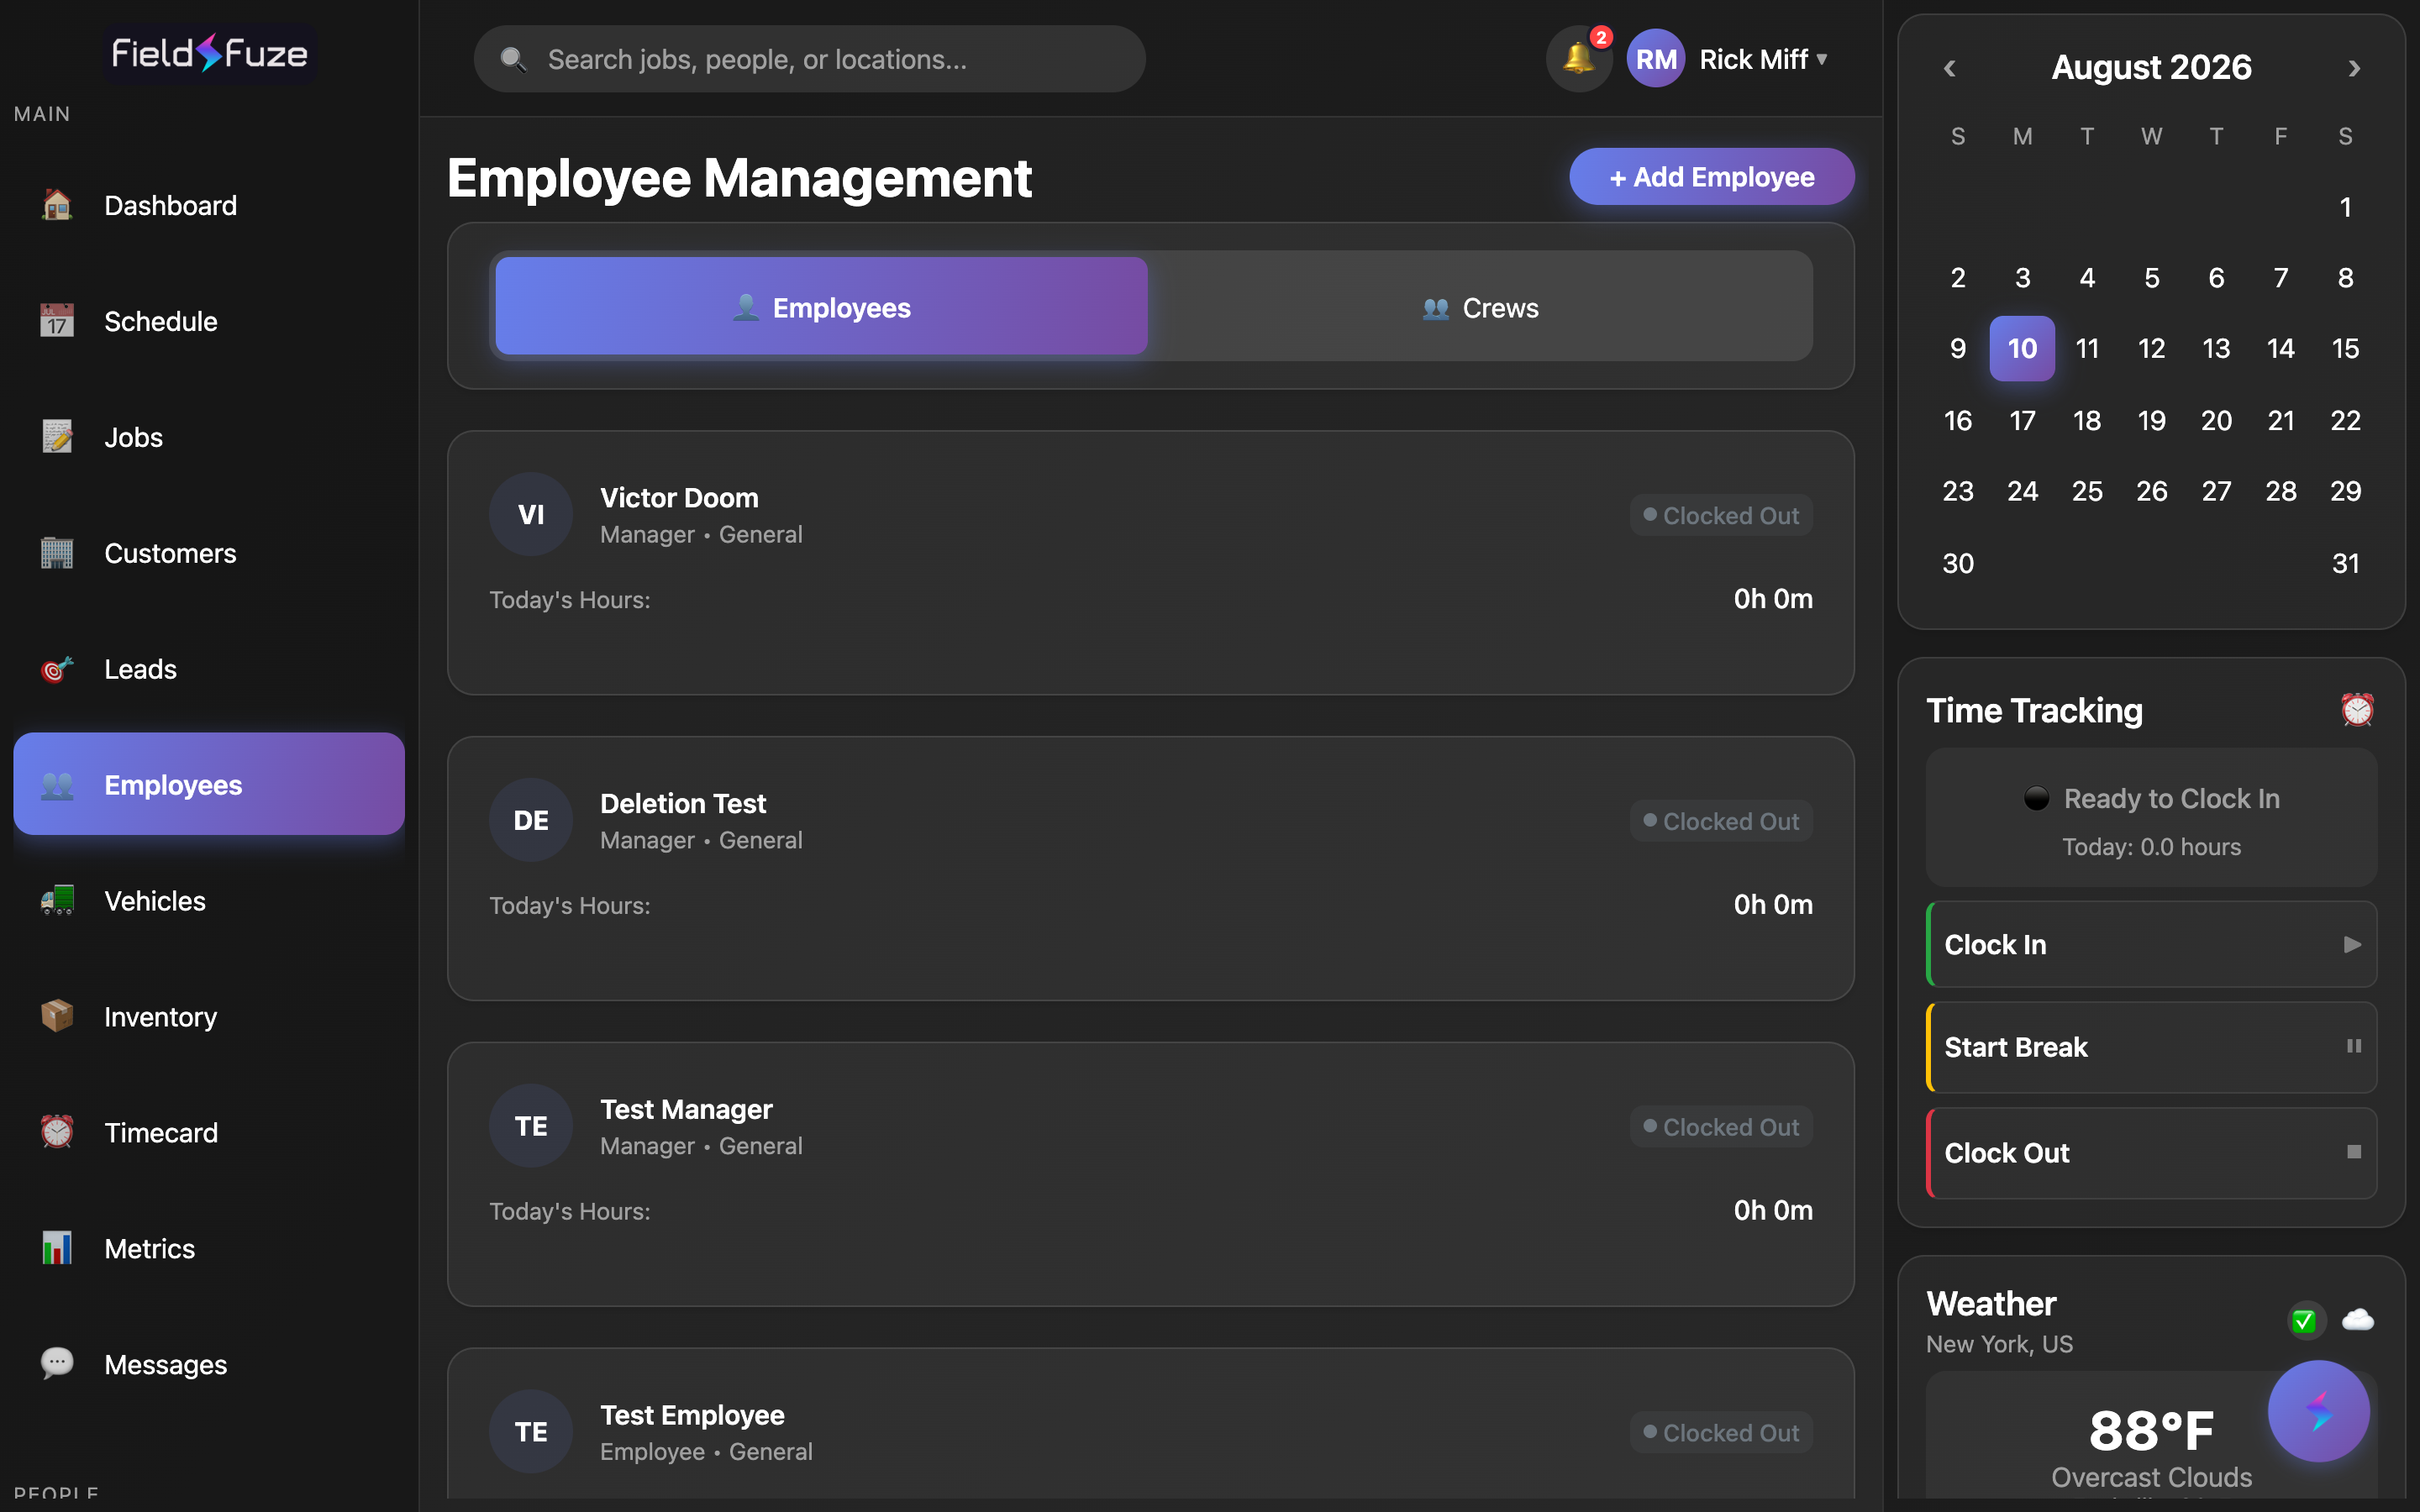
- Use the Employees / Crews toggle to switch between individual staff and grouped crews.
- Each card shows the person's role & department, Clocked In/Out status, and hours today. A live seats used counter sits in the header.
- Crews: create a crew with a lead + members, then assign the whole crew to a job or the schedule. Crew skills come from members automatically.
The roster at a glance
Open Team and you land on the 👤 Employees tab — the full roster of everyone at your company, each on their own card. Next to it is the 👥 Crews tab for the groups you dispatch together. The toggle at the top switches between the two views instantly.
Every employee card packs the essentials into one row so you can read your whole team at a glance:
- Name & initials avatar — with a Laborer badge on field workers so you can spot subs and 1099 crew at a glance.
- Position • Department — their job title and the department you filed them under (e.g. Lead Installer • Roofing).
- Clock status — a green Clocked In or gray Clocked Out badge, updated from the same time clock your team uses on Timecards.
- Today's Hours — total hours worked so far today, formatted like 6h 45m; when someone's on the clock you also see their Clocked In time, and when they're off you see their last Clocked Out time.
- Document status (for laborers) — a quick Docs Valid, Partial Docs, or Docs Needed chip that reflects W-9, COI, and Workers' Comp on file.
The live seats counter
In the header, right beside + Add Employee, a small seats used counter (for example 7/15 seats) shows how many active team members you have. It ticks up as you add people and frees back up the moment you set someone Inactive — so you always know exactly where you stand before you add your next hire.
Adding an employee
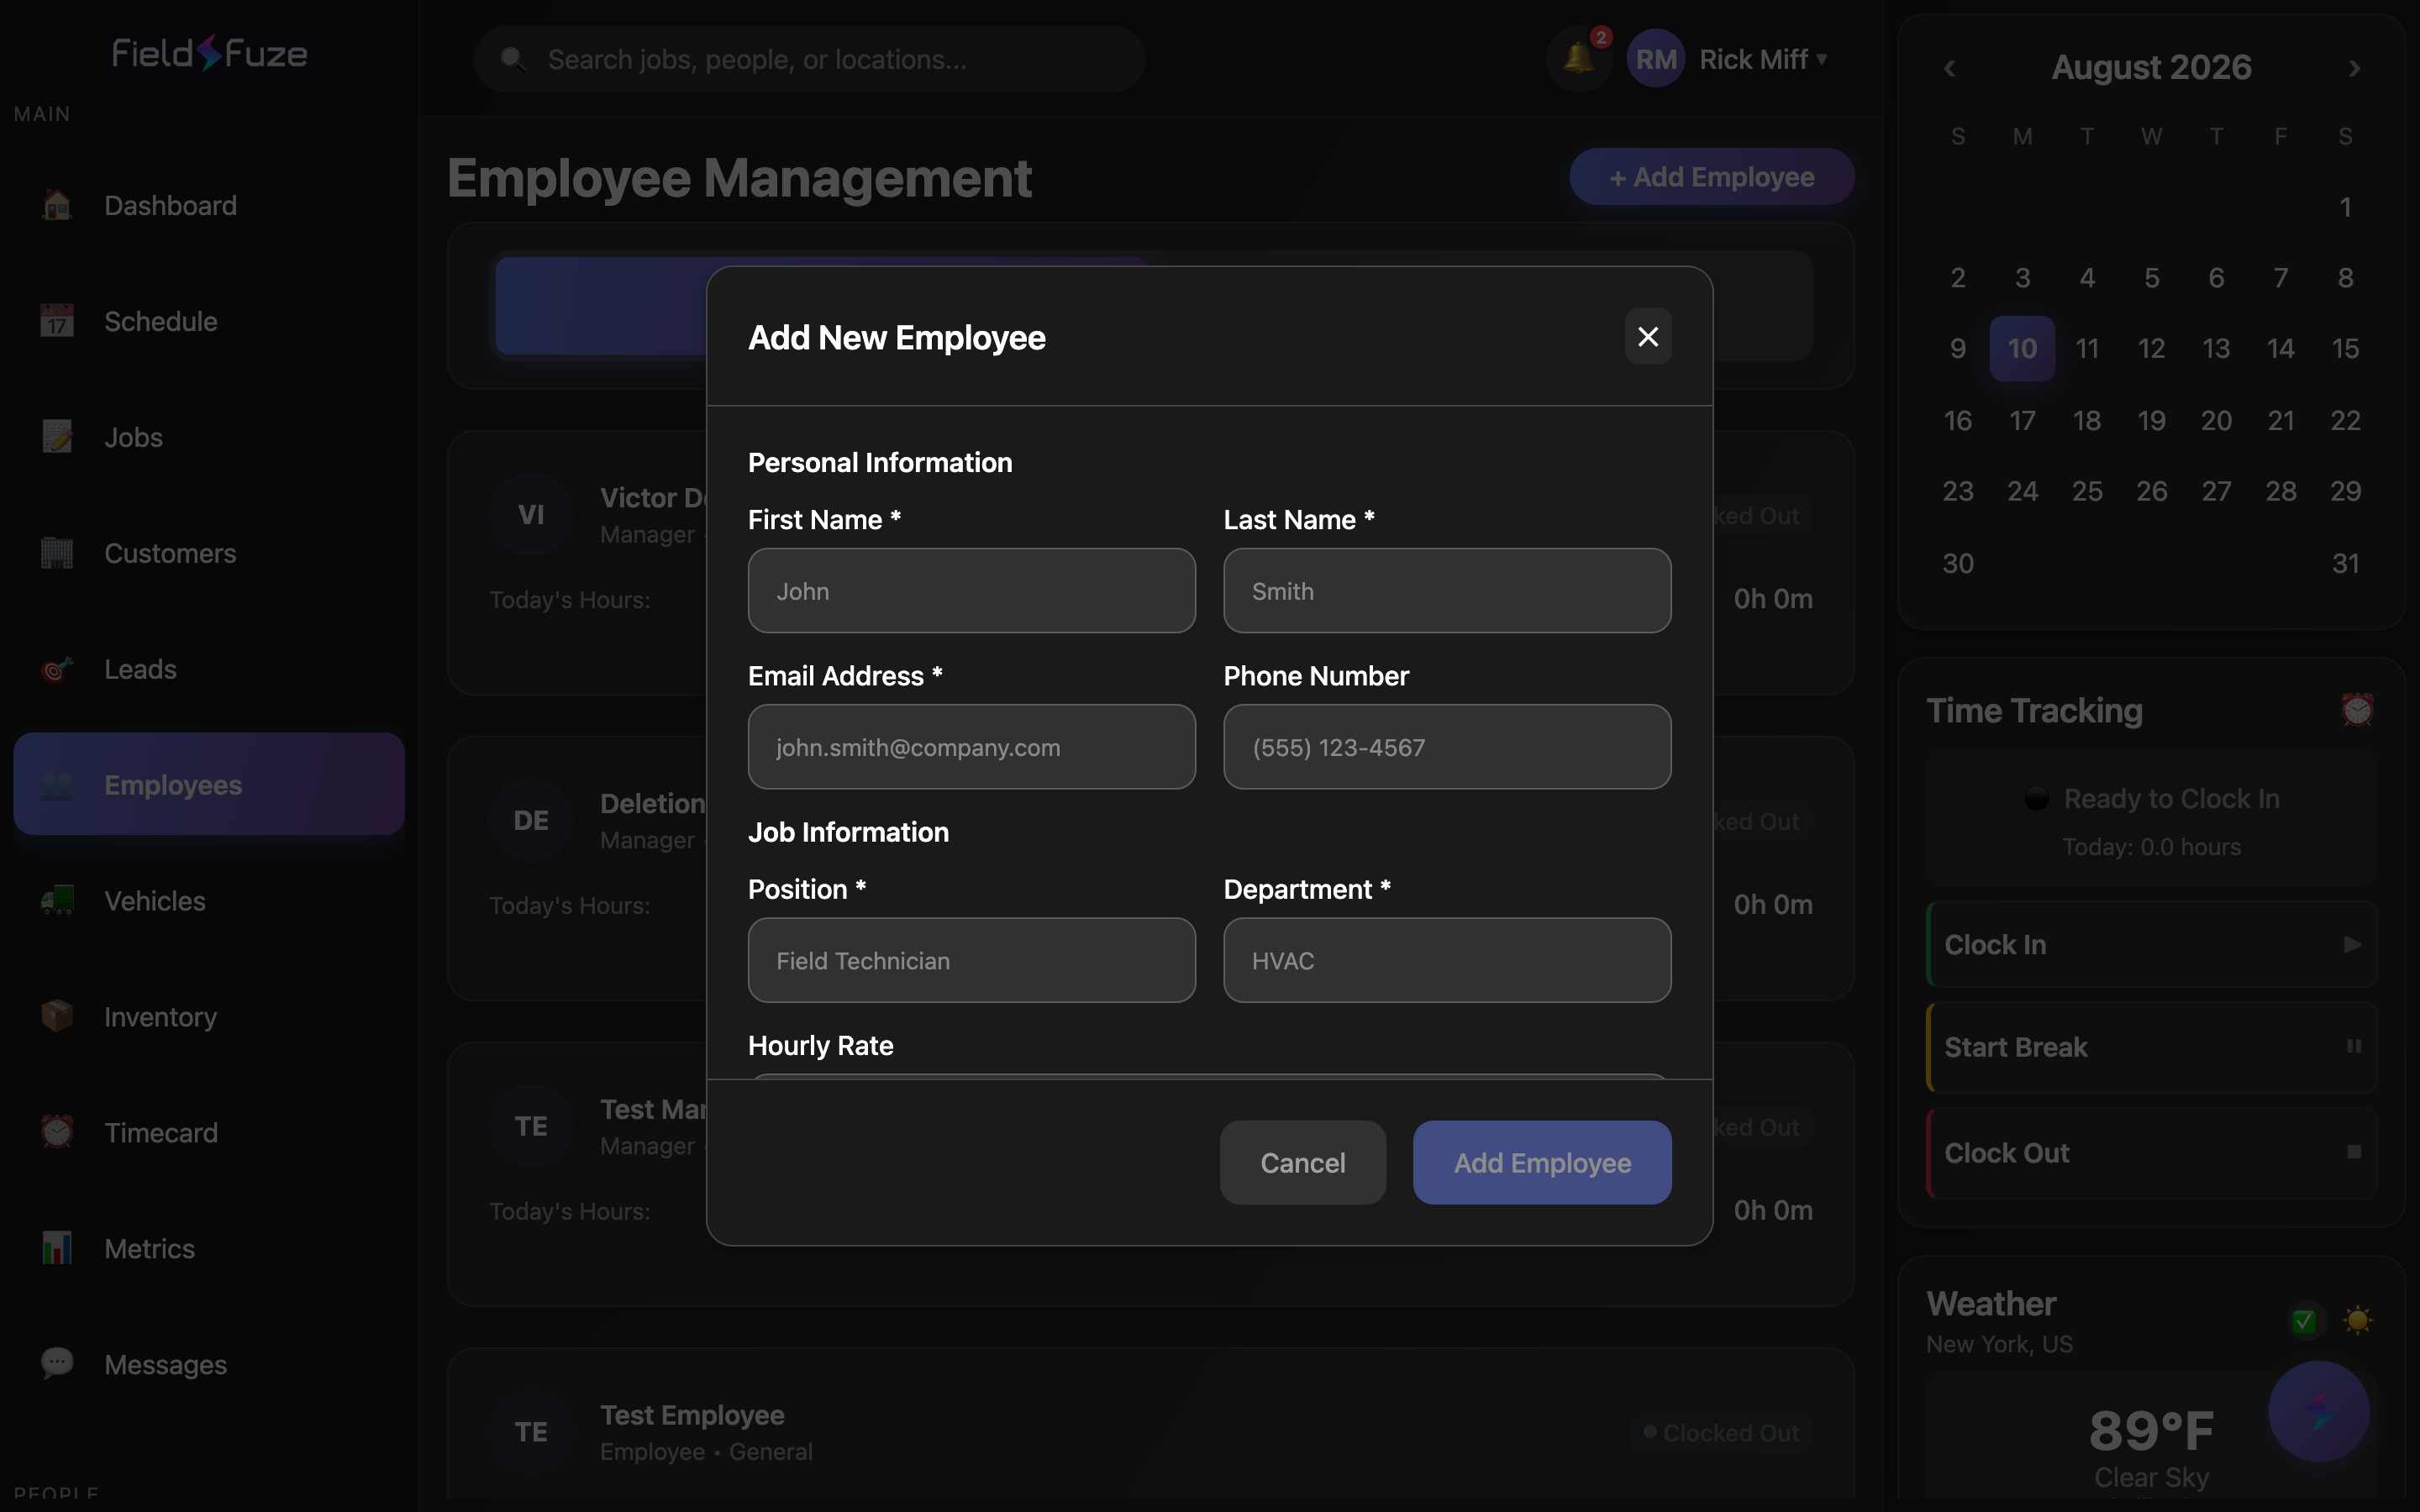
- Click + Add Employee to open the new-employee form.
- Enter their personal info — First Name, Last Name, Email, and Phone.
- Fill in their job info — Position, Department, and Hourly Rate (the rate feeds straight into payroll totals on Timecards). Add any Skills too — these carry over when you build a crew.
- Pick a Role from the role selector — this is what controls everything they can see and do (more below).
- Set a Username and a Password (at least 8 characters; confirm it once).
- Click Add Employee. Their account is created immediately — then share the username and password with them so they can sign in.
That's it: the person appears on the roster right away, the seats counter updates, and they can log in on the web or the mobile app the moment you hand them their login.
When you add someone, FieldFuze builds their account on the spot and they can sign in immediately — just pass along the username and password you chose so they know how to get in. Because you set the credentials yourself, you can onboard a new hire in seconds without waiting on anything.
Roles & permissions — control exactly what each person sees
Every employee has a role, and the role decides what they can do across the whole app. Permissions are organized into 14 categories, each with its own ladder of access from view-only up to full control, so you can be as tight or as open as you like — the roster, the numbers, and the customer list all respect the role you assign.
The 14 permission categories are:
- Jobs — from viewing only assigned jobs up to full create/edit/delete.
- Customers — from name & address only, to full customer records and management.
- Estimates & Invoices — from view-without-pricing up to create, send, and full control (also covers change orders).
- Payments — from view-only, to recording payments, to full control (record, refund, void).
- Revenue & Financials — from own sales metrics only up to full company financial visibility.
- Schedule — from viewing their own schedule up to viewing and editing everyone's.
- Timecards — from their own timecard up to editing and approving the whole team's.
- Employees — from viewing teammates up to full control (add, edit, manage the roster).
- Leads — from their assigned leads and the shared queue up to full assign-anyone control.
- Inventory — from view-only up to full control of items and stock.
- Vehicles — from view-only up to full control of the fleet.
- Communications — from viewing messages up to sending and managing SMS/customer comms.
- Settings — from viewing organization settings up to editing them.
- Billing — access to subscription billing and plan management.
The built-in roles
FieldFuze ships with seven ready-to-use roles, each pre-tuned across all 14 categories so you can put someone to work the moment you add them:
- Owner — full, unrestricted access to everything, including billing. The top of the tree.
- Admin — runs the whole operation day-to-day: full access to jobs, customers, estimates, payments, financials, schedule, timecards, employees, leads, inventory, vehicles, communications, and settings.
- Sales Manager — owns the sales side: full control of estimates and leads, customer editing, team scheduling visibility, and their own sales metrics.
- Estimator — focused on winning work: full control of estimates and bids with the customer detail needed to quote.
- Office Staff — the coordination hub: edits jobs and the schedule, manages customers, sends estimates, records payments, and keeps the roster and leads moving.
- Crew Head — the field supervisor: manages their assigned jobs, sees their schedule and estimates (without pricing), and can view the fleet.
- Laborer — the field worker: clean, focused access to just their assigned work and their own schedule and timecard.
Cloning a role to make your own
The seven built-ins double as templates. When you want a role tailored to how your shop actually works, clone one and adjust it — the new role then shows up in the role selector everywhere you assign people.
- Open Organization Settings → the Operations tab → Roles & Permissions.
- Click + Create Role, give it a Name (e.g. Senior Estimator, Dispatcher) and a short Description.
- Choose which built-in role to clone permissions from — you'll start with that role's exact settings.
- Click Create Role. Then expand it and tap the level chips to fine-tune any of the 14 categories up or down — changes save as you go.
Your custom roles sit right alongside the defaults, tagged with a Custom badge, and can be edited or removed any time. The built-in templates stay pristine — cloning never changes them — so you always have a clean starting point.
Roles control access across jobs, customers, estimates, payments, revenue, schedule, timecards, employees, leads, inventory, vehicles, communications, and settings. Start from a built-in role (Owner, Admin, Sales Manager, Estimator, Office Staff, Crew Head, Laborer) or clone one to make a custom role in Organization Settings → Operations → Roles & Permissions. Managing the roster is itself a role-based ability, so team management stays with the people you trust with it.
Crews — dispatch a whole team in one move
A crew is a named group you schedule together — a lead plus their members. Instead of assigning four people to a job one by one, you assign the crew. Each crew card shows the member count, the Lead, an Active/Inactive status, and the combined skills of everyone on it.
Creating a crew
- On the 👥 Crews tab, click + Create Crew.
- Give it a Name (and an optional Description).
- Pick the Lead Technician and check off the Members to include.
- Click Create. The crew's Skills are pulled together automatically from the lead's and members' skills — no need to re-enter them.
Open any crew to edit it — swap the lead, add or drop members, tweak the description — and it saves automatically as you make changes. Because skills roll up from the people on the crew, they stay accurate as the roster changes.
Once a crew exists, you can assign the whole team to a job or drop it onto the Schedule in one action. It's the fast way to book a standard install team, a repair pair, or a specialty crew — and the combined skills help you match the right crew to the right job.
Keeping the roster current
Tap any employee to open their full detail view, where every field — name, contact, position, department, hourly rate, skills, and role — is editable inline and saves automatically as you type. From here you can also manage the person's time off and see their job history and stats (completed, active, and pending jobs, plus revenue and ratings), all in one place.
Active vs. Inactive
Every employee is either ✅ Active or ⛔ Inactive, toggled right in their detail view. Keep seasonal, on-leave, or former team members in the system as Inactive — you preserve their full history and can flip them back to Active instantly when they return. Marking someone Inactive also frees up a seat, so the seats counter always reflects who's actually working right now.
New office hire: add them with the Office Staff role so they can coordinate jobs, customers, and scheduling from day one. Seasonal install crew: add each field worker as a Laborer, group them into a Crew with a Crew Head as lead, and dispatch the crew to jobs. A role that's almost right: clone the closest built-in in Organization Settings → Operations → Roles & Permissions and nudge a category or two. End of season: flip returning crew to Inactive to free their seats, then back to Active next spring with all their history intact.
Adding an employee creates their login here — set the username and password and share them with the new hire so they can sign in immediately. To offboard someone while keeping their records, set them to Inactive (this also frees a seat). Hourly rates flow into payroll totals on Timecards, and roles you assign here govern access everywhere else in the app.